One of things about owning a house that was built in 1923 is that it requires care. The faucet in our shower had been leaking for weeks. Well, I won't lie, months. I have been a little slow with the repairs. The leak started slow; maybe a drop every few hours. But, it grew progressively worse until it was a steady drip, drip, drip.
Now, if you're like most people I speak with you're thinking, "Big deal. Water is cheap and besides, how much water can a small leak really waste anyway?" Well, according to the U.S. Geological Survey, sixty (60) drips per minute (which is what I estimate our faucet was leaking) amounts to approximately 5 U.S. gallons per day. True, water is cheap in terms of dollars and cents but, what's the impact on the planet? And, for those of you who don't enjoy the occasional hugging of a tree, if the leaky faucet is dripping hot water, it will drive up your costs to heat that water very quickly.
I knew all this already because a big part of my job is providing energy efficiency and conservation information to people on a daily basis. So, why did I wait so long to fix the leak? Good question. I can sum it up in one word; fear. Fear of making the problem worse and having to pay a plumber $150 just to show up, another $50 for the hour it would take to fix the leak and another $50 for the hour he would sit around and BS. So, I starting by taking the typical homeowner approach: I nurtured the hope that the leak would fix itself. It didn't – stupid leak.
I finally decided that I would face my fears and do the repairs myself. Replacing some washers can't be that hard right? Right, it wasn't hard. Even better, it was cheap!
I began by consulting the Reader's Digest Complete Do It Yourself Manual as well as a YouTube video (sign of the times). I shut off the water to the entire house. (In case you're wondering, I had planned to shut off only the water to the shower faucet until I realized that our house did not come equipped with shut offs at each faucet – remember, 1923).
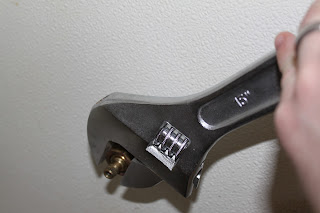
Next step, remove hot and cold knobs. Both the book and the video said that once the screw is removed, the knob should just pull off. After removing the screws, I tried pulling the knobs off. I pulled and pulled and... nothing. I thought this was going to be the end of the entire project. But, like any normal man does when something doesn't work they way it should, I whacked it a few times with the wrench and, no kidding, it worked. Apparently, the knobs had been so corroded after 30 or so years of very hard municipal water, that they were stuck in place. Back on track.
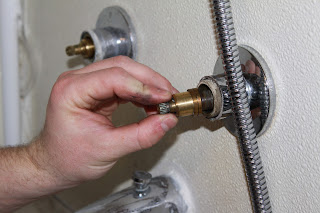
I then removed the hexagonal nut.
Next, I pulled out the cartridge (I made that up because I don't really know what it's called and, honestly, I don't care – I got the job done regardless) and removed any damaged washers.
That ended up being all of them. As a matter of fact, one of the washers on the hot faucet was missing completely. This was long overdue. I had bought a pack of various sized washers so I had plenty. Finally (or so I thought), I reassembled everything and turned the water back on. Surprise, surprise, it continued leaking. Back to the basement to shut the water off again.
When I had everything apart the first time, I noticed that both o-rings looked like they had seen better days. I thought I could get away with recycling them - mostly because I didn't want to make another trip to the local hardware store for new ones. Oh well.
I took everything apart a second time and replaced the o-rings. Reassembled everything a second time and turned the water back on. Guess what? Nothing. No more drips. No more money going down the drain. Well, at least not due to the leak.
What I was worried might cost us a couple hundred dollars ended up costing about $1.50; especially since we walked to the hardware store (the first time). Good deal. I should have done this a while ago... lesson learned.


love your leak story!
ReplyDeleteYay for fixing it yourself! Drew just had to fix our bathtub too. Although ours always seem to be a problem with draining...
ReplyDelete