Friday, December 30, 2011

Water Works

One of things about owning a house that was built in 1923 is that it requires care. The faucet in our shower had been leaking for weeks. Well, I won't lie, months. I have been a little slow with the repairs. The leak started slow; maybe a drop every few hours. But, it grew progressively worse until it was a steady drip, drip, drip.

Now, if you're like most people I speak with you're thinking, "Big deal. Water is cheap and besides, how much water can a small leak really waste anyway?" Well, according to the U.S. Geological Survey, sixty (60) drips per minute (which is what I estimate our faucet was leaking) amounts to approximately 5 U.S. gallons per day. True, water is cheap in terms of dollars and cents but, what's the impact on the planet? And, for those of you who don't enjoy the occasional hugging of a tree, if the leaky faucet is dripping hot water, it will drive up your costs to heat that water very quickly.

I knew all this already because a big part of my job is providing energy efficiency and conservation information to people on a daily basis. So, why did I wait so long to fix the leak? Good question. I can sum it up in one word; fear. Fear of making the problem worse and having to pay a plumber $150 just to show up, another $50 for the hour it would take to fix the leak and another $50 for the hour he would sit around and BS. So, I starting by taking the typical homeowner approach: I nurtured the hope that the leak would fix itself. It didn't – stupid leak.

I finally decided that I would face my fears and do the repairs myself. Replacing some washers can't be that hard right? Right, it wasn't hard. Even better, it was cheap!

I began by consulting the Reader's Digest Complete Do It Yourself Manual as well as a YouTube video (sign of the times). I shut off the water to the entire house. (In case you're wondering, I had planned to shut off only the water to the shower faucet until I realized that our house did not come equipped with shut offs at each faucet – remember, 1923).

Next step, remove hot and cold knobs. Both the book and the video said that once the screw is removed, the knob should just pull off. After removing the screws, I tried pulling the knobs off. I pulled and pulled and... nothing. I thought this was going to be the end of the entire project. But, like any normal man does when something doesn't work they way it should, I whacked it a few times with the wrench and, no kidding, it worked. Apparently, the knobs had been so corroded after 30 or so years of very hard municipal water, that they were stuck in place. Back on track.


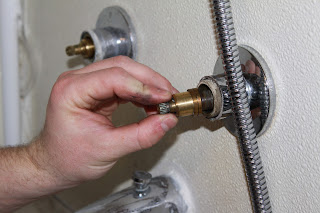
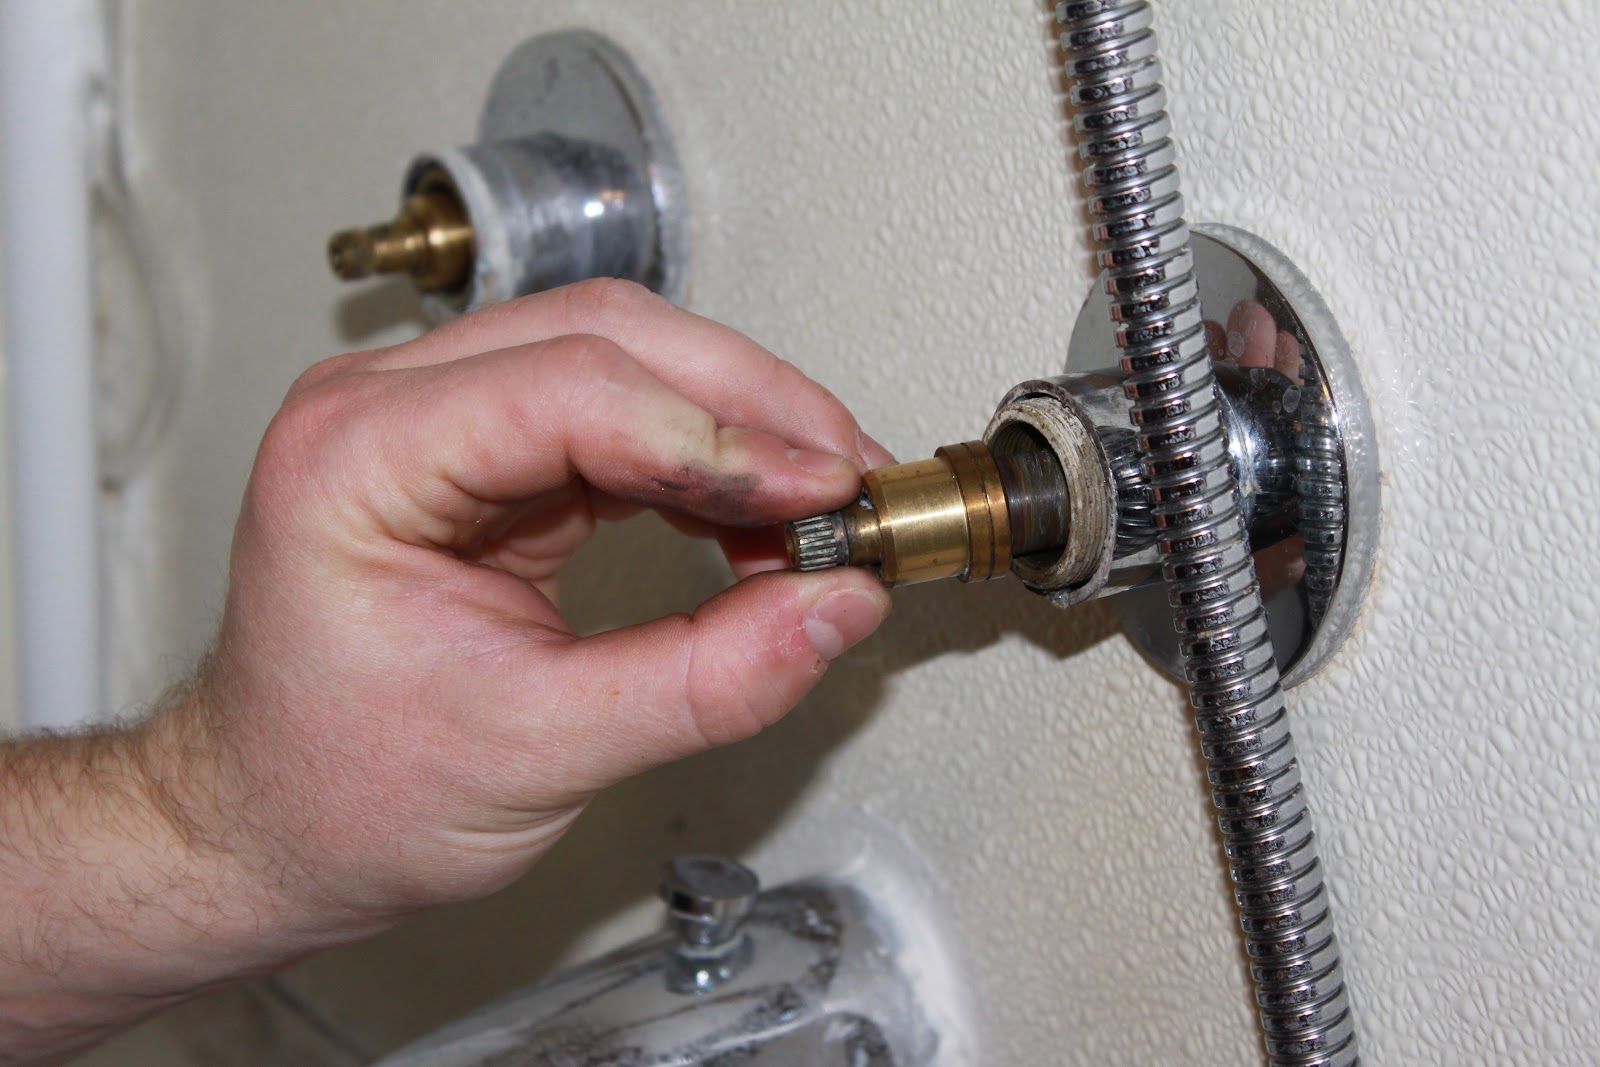
I then removed the hexagonal nut.


Next, I pulled out the cartridge (I made that up because I don't really know what it's called and, honestly, I don't care – I got the job done regardless) and removed any damaged washers.


That ended up being all of them. As a matter of fact, one of the washers on the hot faucet was missing completely. This was long overdue. I had bought a pack of various sized washers so I had plenty. Finally (or so I thought), I reassembled everything and turned the water back on. Surprise, surprise, it continued leaking. Back to the basement to shut the water off again.

When I had everything apart the first time, I noticed that both o-rings looked like they had seen better days. I thought I could get away with recycling them - mostly because I didn't want to make another trip to the local hardware store for new ones. Oh well.

I took everything apart a second time and replaced the o-rings. Reassembled everything a second time and turned the water back on. Guess what? Nothing. No more drips. No more money going down the drain. Well, at least not due to the leak.

What I was worried might cost us a couple hundred dollars ended up costing about $1.50; especially since we walked to the hardware store (the first time). Good deal. I should have done this a while ago... lesson learned.

Thursday, December 29, 2011

A Simpler Life


Horse-and-Buggy Mennonites is not the kind of book I usually pick up, but as this month's book club selection, I was willing to give it a try. Though it took me about two weeks to read it, and I was relieved that the last hundred pages were appendices and indexes, there was a lot of interesting information to be found.

Horse-and-Buggy Mennonites is a study of the Wenger Mennonites, an Anabaptist group centralized in Lancaster County. It follows their history, and the decisive split over the automobile, coming into present day beliefs and codes of behavior. Living in an area with a large Mennonite and Amish population, it was interesting to gain more insight into why they live the way they do and the process in deciding what technologies are acceptable and what should be banned. By making conscientious decisions about whether things like cars, rubber tires, phones, fax machines, or computers should be allowed and to what extent, the Wengers have not only remained intact in modern times, but are actually a thriving community with church districts in many states and a growing population.

One of the most important aspects of Wenger life is what the book refers to as the redemptive community. The Wengers do not consider the church to be a building; rather, it is the group of believers. As such, they support each other in times of need but also are a strong enforcing element, holding fellow believers to a higher standard of behavior and adherence to church rules than "outsiders" (that would be the rest of us). I found many of their practices, such as the emphasis on family, connection to the land, and supporting the community in times of need, to be things the world at large could use more of.

The book itself is a little dry to read, but it is packed full of information and anecdotes of a lifestyle I knew very little about, even having lived in areas with Mennonites and Amish all my life. I think anyone who wonders what the difference between Amish and Mennonites would enjoy reading Horse-and-Buggy Mennonites.

Wednesday, December 28, 2011

All I Want for Christmas

I can't believe I forgot to mention this in yesterday's post because it is big news around here...Bert has his two front teeth! His bottom teeth are both poking through and were visible by Christmas. We had been feeling them in the week leading up to Christmas but now they are definitely there. During the day, he doesn't seem too bothered by the teething, but he has been fussier at night and I'm guessing those chompers are to blame. Sorry, no picture. The little man won't cooperate for a good shot.

Tuesday, December 27, 2011

The Wrap Up

The Christmas weekend passed in a whirl of driving, visiting, eating, visiting, eating, eating, eating, and driving. Oh, and some story reading, present opening, cow watching, and catching naps where and when you could. Would you like to see that in picture form?

Keith reads "The Night Before Christmas" to
a cranky Bert
Who needs another cookie anyway?
The tape was much more interesting than the present
A happy Bert ready to open his stocking 
Bert's first encounter with Popper's cows
Catching a nap on the walk home from the barn
Christmas may be over on the calendar, but we haven't stopped celebrating yet! We still have grandparents, great-grandparents, aunts, uncles, and cousins to catch up with this week before we call it quits on Christmas. Though from that last picture, you would think Bert has had enough!

Friday, December 23, 2011

Ambition vs. Reality

In mid-October, I had the brilliant and ambitious idea to cross-stitch a Christmas stocking for Bert. I ordered a book of patterns, picked one and promptly got started. This is the picture in the book:


Here's a look at the two (yes, two) pages of the pattern and charts:


And here is how far I got, as Christmas rapidly approaches:


Apparently, I should have started this as soon as I knew I was pregnant. It would certainly be a lot easier to concentrate on without Bert and his myriad of needs and demands. I can only hope that it is done by next Christmas. I'm showing all of you this so that you can prod me along to getting it finished!

Thursday, December 22, 2011

Fudging It

I would be hard pressed to say what my favorite holiday treat is. Peanut butter kiss cookies? Pizzelles? Snowballs? Eggnog? Peanut butter fudge?

Ok, it's probably peanut butter fudge. Peanut butter fudge has been a Christmas staple for as long as I can remember and Keith and I have been making it for family and friends since the first Christmas we were married. The recipe my family uses is really simple and nearly fool-proof.

Peanut Butter Fudge

3 cups sugar
1 cup milk

Boil to soft ball stage. (235-240 degrees F if you have a candy thermometer, or drop a bit from a spoon into a small cup of cold water; when you can pick it up and roll it into a ball, it's ready.) Be sure to stay close by and keep stirring it. If you boil it past the soft ball stage, the fudge will be crumbly.


Add 1 jar of marshmallow cream (7 oz.) and 1 jar of peanut butter (18 oz). (I like to have these out of the jars and in a large bowl and then pour the sugar and milk combination in.)


Stir until well blended.

Pour into greased square baking pan and let cool. (To give as gifts, we line tins with wax paper and pour the fudge directly in.)


Simple, right? Try to give most of it away or you will end up eating far more than you should!

Wednesday, December 21, 2011

Shalom in the Home

Last night we celebrated the first night of Hanukkah, and Bert's first first night of Hanukkah. For us, lighting the Hanukkah candles is a nod to my Jewish heritage and a reminder to slow down and enjoy simple things, like the flickering of candles, in our busy lives. Keith always has a few small, thoughtful Hanukkah gifts for me, and even Bert had something to open.


While I'm thinking of it, I would also like to share a prayer for travelers I came across, as we all get ready to travel to see family and friends for the holidays. Or in the case of my cousin, you are getting ready to take the trip of a lifetime to Israel!

May God direct your steps toward tranquility and keep you from the hands of every foe. 
May you be safe from all misfortune on this earth. 
May God grant you mercy in his eyes and in the eyes of all who see you.

Happy Hanukkah to those of you who celebrate it, and to everyone else, may you experience all the wonder and miracles of this happy season!

Tuesday, December 20, 2011

A Bridge to Another Time

If you haven't noticed, there is a new tab at the top of the page titled "Ex Libris." I am going to start filling you in on what I'm reading and that page will contain a running list of what I've read and link to the review posts (like this one). This serves two purposes: 1) you get to find out a little bit more about me and maybe some good book suggestions, and 2) I have something to write about all winter long while quarter-acre hibernates. Books and baby pictures; that's what you're getting this winter.


The Invisible Bridge by Julie Orringer

The Invisible Bridge is the story of Andras Levi, a Hungarian Jew who leaves his home to study architecture in Paris in the late 1930s. There he finds friendship, love, and a passion for his art while struggling against prejudices, secrets, and the threat of war. As the war escalates and consumes Europe, Andras is required to return to Hungary and then to the harsh world of the forced labor camps. Resourcefulness, luck, and the strength of the love between family and friends pull the characters through unthinkable difficulties and draw the reader into their lives.

The depth and authenticity of the characters made The Invisible Bridge captivating. The triumphs they achieved, the struggles they overcame or succumbed to, and the emotions they experienced all felt real and believable. The period of the book, which begins in 1937 and continues past the end of World War II, is a familiar one in history and literature but Orringer broadens the scope of the times as Andras bears up against the horrors and uncertainties of being conscripted into the labor battalions of eastern Europe.

I found the book to be engaging and powerful. The story spanned more than a decade, but I didn't feel that the author had to hurry the pace to cover that much time. In fact, the pages were rich with day-to-day details of the characters' lives, in times of relative peace and in the midst of heartache, that made the book convincing. Stories of survivors of World War II and the Holocaust, both fiction and historical accounts or memoirs, are among my favorite books to read and The Invisible Bridge did not disappoint.

Thursday, December 15, 2011

Little Guy, Meet the Big Guy

Since Bert was about two weeks old, we've been going to the library for what they call lap-sit story time at least once a week. He loves the songs and stories and the lap time, but today it got even better. Bert got to sit on the most famous lap in the world...


He seemed more than a little confused, but unlike most of the other kids, he didn't cry. I'm just relieved that he didn't spit up on Santa's nice red suit. Pretty sure Mrs. Claus has enough to do without removing curdled milk from velvet. And yes, Bert did wear reindeer booties and his Snoopy Christmas onesie for the occasion. What can I say, the kid is a sharp dresser.

I'm also glad he didn't yank off Santa's beard. It would have been terrible to be the people responsible for making the parents of about 20 preschoolers explain why Santa's beard is detachable.


I think I overheard him asking Santa for a pony. And I think Santa said Popper could help in that department. Right, Popper?

Tuesday, December 13, 2011

Cha-cha-cha-changes

Bear with me. I have been thinking about changing up the look of the blog for awhile. I started out with a simple blogger template but, as a graphic designer, that's just kind of sad. So this is a first attempt at a new look. Not sure if I'm sold on it but it's a start. Don't be surprised if you see some changes going forward. And I hope to figure out how to get rid of that really awkward white space between the header and the page tabs. Thanks for your patience and feel free to give me some feedback. Even if you really, really hate what you're seeing.

Souper Simple

I am a soup fan. My mom is a soup fan. Keith is on the fence. So with my mom's visit over the weekend, soup was on the menu and I had a new recipe I wanted to try and it didn't disappoint. It's a keeper and even Keith agrees. I think it appeals to Keith because 1) it is very thick and hearty, more like a chili or stew than a broth-y soup, and 2) it has beer in it.

Beer-Braised Pork and Black Bean Soup
Real Simple, October or November 2011 (I think)


2 12-ounce bottles of beer (preferably lager)
1 tablespoon chopped canned chipotle chilies in adobo sauce, plus 1 tablespoon adobo sauce
   (I found these in the Latin cooking section of the grocery store, not with the salsa and tortillas)
1 teaspoon ground cumin
1 large onion, chopped
1 pound dried black beans, rinsed
1 1/2 pounds boneless pork butt (pork shoulder)
1/2 cup sour cream
1/2 cup salsa
1/4 fresh cilantro

In the bowl of a slow cooker, combine the beer, 3 cups water, the chilies, adobo sauce, cumin, onion, beans, pork, and 1 1/2 teaspoons salt. Set the slow cooker to high and cook, covered, until the beans are tender and the pork pulls apart easily, 4 hours. (I set mine on low for 8 hours and that worked fine.) Using a fork, separate the pork into large pieces. Divide among individual bowls and top with the sour cream, salsa, and cilantro.


It isn't the prettiest meal I have ever made, but it tasted good and you can't beat a one-pot slow cooker meal! I also made a batch of these oatmeal rolls to eat with it. And though we are soup lovers, I think my mom and I could have just made a dinner out of the fresh rolls spread with butter. Maybe man cannot live on bread alone, but I know a few women that can.


We used a stout beer from our local microbrewery and the soup kept some serious beer flavor which might not be as evident with a lager. The chipotle chilies and adobo sauce really turned the heat up (think buffalo chicken-level heat) so I think next time I will try just a can of green chilies to get a bit of the bite but less heat. We used a lot more than 1/2 cup of sour cream because it helped to mellow out the spiciness.

Keith and I ate some of the leftovers Sunday night for dinner, putting it on tortilla chips with some sour cream, cheese, and salsa and eating them like nachos and that was great too. We froze the rest to eat later. Simple, hearty, and tasty. Definitely a keeper.

Monday, December 12, 2011

Have Dessert First

This weekend, my mom came down to visit. Since she is always so good about keeping us well-fed when we go to visit her, I thought it was about time I returned the favor. Even if she is perfectly content to call cheese and crackers a meal. So I got daring and pulled out two recipes that have been hanging out in my recipe box, waiting to be tried out for the first time on unsuspecting guinea pigs, I mean guests. I'll get to our Saturday night dinner in another post, but I wanted to share our dessert first, because you might have a holiday party coming up and this has "What-the-heck-I-already-ate-10-cookies-sure-I'll-have-a-piece" written all over it. Without further ado,


Chocolate Fudge Pie
Real Simple, November 2009


1 piecrust, store-bought or homemade, fitted into a 9-inch pie plate
6 ounces semisweet chocolate, chopped, plus more shaved for topping
1/2 cup (1 stick) unsalted butter
3 large eggs
1/8 teaspoon kosher salt
1/2 cup plus 3 tablespoons granulated sugar
1 1/2 cups heavy cream

Heat oven to 375 degrees. Place pie plate on baking sheet. Prick crust with a fork and line with foil. Fill to top with pie weights or dried beans. Bake until the edges are firm, 20 to 25 minutes. Remove the foil and weights and bake until just golden, 8 to 10 minutes. **I used the piecrust recipe from my Better Homes and Gardens cookbook and followed those instructions for making a baked pie shell. They are at the bottom of the post.


Reduce oven temperature to 325 degrees. In a heatproof bowl set over (not in) a saucepan of simmering water, melt the chocolate and butter.

It's like they knew I don't
own a double-boiler...

Using an electric mixer, beat the eggs, salt, and 1/2 cup of the sugar until fluffy, 4 to 5 minutes.


Fold a third of the egg mixture into the chocolate mixture, then fold in the remainder.

Yup, I tasted it right about now, raw eggs and all.

Pour the combined mixture into the crust and bake until puffed and beginning to crack, 20 to 25 minutes. Cool for one hour, then chill.


Beat the cream with the remaining sugar until soft peaks form. Spread over the pie and sprinkle with the shaved chocolate.


Devour.


Now that your mouth is hopefully watering, I'll back up and give you the pie crust instructions. Let me say that one of my goals in life is to make pie crusts that are as pretty as my mom and grandmother's. I'm not there yet, but a decent pie crust is not as elusive as I once thought it was. Here's how I make mine, Better Homes and Gardens style.

Pastry for Single-Crust Pie

1 1/4 cups all-purpose flour
1/4 teaspoon salt
1/3 cup shortening
4 to 5 tablespoons cold water

In a medium bowl, stir together flour and salt. Using a pastry blender, cut in shortening until pieces are pea-size.

Sprinkle 1 tablespoon of the water over part of the flour mixture; gently toss with a fork. Push moistened dough to the side of the bowl. Repeat moistening flour mixture, using 1 tablespoon of the water at a time, until all the flour mixture is moistened. Form dough into a ball.

On a lightly floured surface, use your hands to slightly flatten dough. Roll dough from center to edges into a circle about 12 inches in diameter. (I like using a pastry cloth and rolling pin cover.)

To transfer pastry, wrap it around the rolling pin. Unroll pastry into a 9-inch pie plate. Ease pastry into pie plate without stretching it.


Trim pastry 1/2 inch beyond edge of pie plate. Fold under extra pastry. Crimp edges as desired. Bake as directed in individual recipes.


Baked Pastry Shell: Prepare as above, except prick bottom and sides of pastry with a fork. Line pastry with a double thickness of foil. Bake in a 450 degree oven for 8 minutes. Remove foil. Bake 5 to 6 minutes more or until golden. Cool on a wire rack.

And that, my friends, is how you bake a little slice of heaven.

Sunday, December 11, 2011

Taking Stock While Making Stock

Last weekend, I spent Sunday making homemade chicken stock, but to just tell you about that alone is boring. So, I’m going to include a little story. Oh, and don’t expect a recipe here, I don’t have one. I have found that I enjoy “winging it” when it comes to cooking – usually to Tara’s chagrin. “Winging it” is maybe not entirely accurate. I generally have an idea of ingredients that work well together from my days as a cook – but no measurements.

So, before I talk about the chicken stock, I want to explain how we got to this point and what the heck I know about making stock – in case you’re wondering. This is important because I like to think I had a hand in teaching Tara to cook, though, at this point she has far exceeded my skill level; especially when it comes to creativity. She believes it was part of some master plan or as she put it, “Cook for a woman and she eats for a day; teach a woman to cook and a man eats well forever.” That wasn’t my intention, but it worked out pretty well.

At age fifteen I began working at a regular chain restaurant as a bus boy. I’m not going to lie, the work was terrible and the pay was worse. Part of my job was to keep the bathrooms clean between cleaning tables (think about that the next time you go out to eat). $5.15 per hour to clean puke off the floor after some kid stuffed himself sick on spaghetti and an oversized sundae was not part of the official job description when I applied. Oh, how I hated kid’s night. It wasn’t long before I decided that I wanted to be in the kitchen creating the spaghetti dinners – rather than dealing with them post mastication and partial digestion. So, I decided to move on.

The first step was getting into the kitchen. I ended up as a dishwasher at an assisted living home. Actually, I began as a waiter but I lasted only one day in that position. After I was hit in the face with a bowl full of pureed meat product delicately mixed with an unrecognizable medley of mashed up veggies (you know your mouth is watering), I asked to move to the dishwasher position. The woman behind the meat bowl had dementia so I certainly don’t fault her but, nevertheless, one bowl of pasty goodness in the face was enough for me.

Washing dishes and pots and pans really wasn’t bad. The hardest part of my duties was keeping the kitchen spotless. And, in a facility like that, I do mean spotless. We had inspections more often than Joan Rivers has plastic surgery. I think she’s trying for the Benjamin Button effect.

Anyway, the goal was to get behind the line - to get cooking. Eventually, I was successful in moving into a line cook position. It was a dirty, hot, exhausting job – that was great. I learned a lot and probably ended up doing more customer service from that position than being a waiter; the elderly are picky eaters you know. I never did learn how to make over easy eggs that are scrambled as one lady demanded. It was hard to make food, which was required to be overcooked and bland for health reasons, still taste good. That was part of the challenge and I learned that appearance really can be everything.

One of the draw backs to cooking in a facility like that is that following recipes is an absolute must; both for health reasons (limiting the amount and variety of ingredients) as well as for concerns over food cost. I felt like cooking was the only form of art I was capable of doing and I wanted to learn more while, at the same time, recognizing that I wasn’t planning on making a career out of this.

I worked a second job for a while as a cook for a catering company. The biggest challenge there is constantly working in a kitchen you are not only unfamiliar with but you have never even seen before. You know your oven at home cooks slightly faster in the back right corner – I had no such prior knowledge of those kitchens.

Finally, my brother got me a job cooking at a local, reasonably high-end restaurant where he was Executive Chef. Now, that is what I was looking for. That place built every meal to order, from scratch. Sure, many of the soups and sauces were made in advance to save time during the dinner rush and, of course, there were some recipes that you followed – how else would you know what to keep in inventory? But no expense was spared on ingredients. And, you were encouraged to try new ingredients and flavor combinations. I learned how to make lobster and duck and spicy peanut soup. I learned how to make real crab cakes; not the stuff you get in the freezer isle or at your local diner. I learned the importance of slicing all of the pieces of zucchini and squash exactly the same size and thickness so that they all cooked at the same pace – no burnt or mushy pieces mixed in with nearly raw pieces at that place. All of those things were a far cry from blended meat product and veggie medley.

By the time I left there, I had memorized how to make a variety of dishes. And, I had acquired the ability to piece together new combinations. So… what was this post about again? Ah yes, chicken stock. So most of the cooking I have done since then has been without a specific recipe. That brings us, finally, to the chicken stock.

Now, the stock we made at that restaurant consisted of chicken and duck as well as a much larger variety of veggies. My stock is a much more simplified (read as “cheaper”) version. I started by cutting celery, carrots and onions into large chunks. I put them in a pot (actually, two pots since we don’t have any huge ones) along with whole garlic cloves and a variety of herbs and spices. Those included fresh rosemary, oregano, poultry seasoning, salt and whole black peppercorns among other things that I can’t even remember now. I put in a few chicken backs (with the bone) along with various, otherwise useless, chicken parts.

I added water, brought to a boil and then let simmer for around 4-5 hours; basically until the meat falls apart and all the flavor is cooked out of the veggies. There should be oil on top of the stock from the chicken fat. I usually taste it a few times during the simmering and add various things to taste. Also, since it cooks down and becomes concentrated, I add water so that it is ready to use when needed. It takes up more space but is a little easier in a pinch.

After letting it cool, we filled up former quart yogurt containers and put the stock in the freezer (it’s a good thing Tara likes yogurt). I believe it turned out pretty well and it made a ton – probably enough to last us all year.

So, that’s my very simple chicken stock – about the easiest thing to make. And, now you know why I enjoy cooking and why my cooking often annoys Tara – the “winging it” doesn’t always turn out the way I imagine it will; but that’s half the fun. I encourage you to try different things and throw away the recipe card from time to time. Good luck and enjoy!

Monday, December 5, 2011

On a Whim(sie)

As excited as we are about Bert's first Christmas, we are keeping his present pile small (read: present pile, not present mountain). A couple toys, a book, a stocking full of baby food, that about sums it up. Besides, he's bound to get spoiled by his grandparents and great-grandparents, so we figured we can keep it pretty low key. That and he doesn't have a clue what's going on.

I did, though, want to make him a whimsie ball. Ever heard of them? It's a fabric ball made up of stuffed, roughly triangular, pillows. I've made a few for friends and babies, and even one with catnip for a cat, using a pattern my mom has had around for years. (The pattern has a 1988 copyright on it so I'm not sure how widely available it is anymore, but here is a link to a site where you can buy it if you are interested.) Since Bert is getting more mobile and has quite a grip, I thought he might enjoy a ball he could get his hands on.


After I had the pieces cut out and sewn together (using leftover terry cloth from his changing table cover and some other fabric I had around), it was time to stuff each pillow. Bert loves a little fabric book he has with crinkly, noisy pages and I wanted to get that same effect in the whimsie ball. I was kind of stumped for awhile as to what I could use. Then Keith was eating chips out of the bag one night and I couldn't hear the tv over the crinkling bag and a light bulb clicked. So I saved and washed a few chip, cracker, and cereal bags, then cut them into trips and stuffed about half of the pillows for the ball.


I also wanted to incorporate a rattle so I saved two bottle caps, one slightly larger than the other so they fit together, and put a couple small buttons inside and taped them together.


Then I filled the remaining pillows with regular cotton batting, tucking the rattle into one. The next step was to sew all the pillows together. First you take three pillow and sew their points together, and then the tops.


You end up with four sections like the one you see above, and those get sewn together into the finished whimsie ball.


It wasn't exactly a quick project, but I do enjoy making whimsie balls. I'm excited about how it turned out and hope Bert enjoys it. And if he doesn't, at least it didn't cost me anything since I was able to dig everything I needed out of my craft closet!
Related Posts Plugin for WordPress, Blogger...