Friday, December 2, 2011

Tradition, Tradition!

If you belong to my mom's side of the family, you just started singing the song from Fiddler on the Roof when you saw the post title.

Keith and I are really excited about starting holiday traditions with Bert, even if he doesn't have a clue what's going on this year. You've already seen the advent calendar I made with the mom's night group, but we have two other ones we are counting down with this year as well. The first came from my Mom-mom, who has given my brother and I advent calendars for as long as I can remember. This is an upgrade though because instead of just a picture behind each little door, now there's chocolate!


Then I stepped out to get the mail the other day to find a big envelope containing another calendar from my ever-thoughtful friend Claudia. It's based on an Eric Carle book and pops up into Santa and a tree and each door has a little paper ornament to hang on the tree. How clever is that? I think if we are careful with it, we can use it year after year.


My Mom-mom gets the gold star for getting us started on traditions. When we saw her over the Thanksgiving weekend, she also had a Mary Engelbreit cookies-for-Santa plate for us. Mary Engelbreit has been one of my (and Mom-mom's) favorite illustrators for a long time so I'm really excited about this.  I can't wait until Bert is old enough to put out a glass of milk and fill this plate with cookies for Santa. And don't forget a carrot for the reindeer and of course, cheese for Santa Mouse!


Last but not least is a tradition that is brand-new to Keith and I, and certainly to Bert: Elf on the Shelf. Mom-mom brought the book and elf set for Bert and the elf is now on his first perch, the newel post at the bottom of the steps.


The book says we are supposed to give him a name. And what else would we name him but Herbie, Santa's friendly Head Elf that wrote my brother and I letters at Christmastime for years?

So even if Bert is just kind of along for the ride this year, Keith and I are feeling more excited about the holidays than we have for years. This year is like a dress rehearsal for when Bert is a more engaged audience!

Wednesday, November 30, 2011

A Few Cards Short of a Deck(ed Hall)

I have to begin with an apology. I had grand plans of documenting each step of this project and giving everybody a step-by-step how-to to make their own. And I thought I did. Until I sat down to write this post and realized I hadn't taken all the photos I thought I had. I didn't even take a final product photo before wrapping it up and giving it as a gift. So bear with me. I think I can do this so everyone gets the gist.

What we're building is a wine cork wreath. Here is a list of the materials you will need:

• Wine corks (champagne corks work too) - you'll need lots of them so I enlisted family and friends to help me save them
• Styrofoam wreath - I used a 12" one
• Hot glue gun and glue sticks
• Moss - I like the reindeer moss found at Michael's
• Fabric or felt to cover back of wreath
• Twine for hanging
• Ribbon for bow

You will want to start by playing around with your corks and seeing how you like them arranged before gluing them. Since I was working with a variety of champagne and wine corks, I arranged the champagne corks on the top of the wreath and the wine corks around the inside and outside. When you have something you like, just start gluing. Try not to burn your fingers with the hot glue!


Don't worry about the corks not fitting in tight against one another. That's where the moss comes in. Once all your corks are glued on, squeeze hot glue into the crevices between the corks and fill them with the moss.


Once all the moss is in, I like to cover the back of the wreath with fabric or felt to help protect the styrofoam. In hindsight, you could create nicer, finished looking back by putting the fabric on first and wrapping it over the edges a bit, then gluing the corks and moss on. Maybe next time...


Then I just take a length of twine and loop it around the top to hang the wreath with and add a bow. Here's a website I found on how to make different kinds of bows. That will have to suffice since I didn't take a photo of my bow. Admittedly, my bow did not come out as nice as the ones on that website so maybe it's best you didn't see it.

And now for the final reveal! Or not, since I made the biggest blogger faux pas out there and forgot to take a shot of the final product. But even though I don't have a photo of this wreath, I took one of the wreath I made for myself a couple years ago so I think you'll get the idea.


That is a super sad looking bow. I might have to redo that for myself now that I found directions on how to make one. And I have to say I really like the variety of using both champagne and wine corks instead of all wine corks like on the one I made for myself.

My last tip is that as you collect corks, you might end up with a lot of the synthetic ones. I don't like to use them on wreaths but don't throw them out. I found that they work well in place of stones in the bottom of flower pots for drainage. Then your pots aren't as heavy to move around.

So start drinking and get crafting!

Monday, November 28, 2011

Turkey Day and Beyond

Thanksgiving weekend is always a busy one for us, but one we really enjoy. And what could be better than Bert experiencing his first Thanksgiving and Thanxmas?

Bert started his first Thanksgiving off by pretending to be a turkey.


After a quick basting, he headed off to his Grammy and Pop-pop's house, where he visited and got in some Uno action with his uncle and cousins.


In a very brief window of opportunity, all four boys sat still for a picture. Handsome devils, aren't they?


Then Friday morning it was off to Memere and Popper's, where Memere was excited to feed Bert his cereal. After a lunch of leftovers, we headed out to do a little shopping. No big malls, but we did our Shop Small Saturday on Friday by going downtown and checking out local businesses.


I would have to say Bert was much more excited about his first bite of pumpkin pie from his great grandpop. He's been promised this pie since he was about 3 days old and he wasn't disappointed.


Then on Saturday, we were off to Thanxmas, our annual Christmas gathering with my grandparents, always on the Saturday after Thanksgiving. Like a dope, I didn't take any pictures but it was a great time and Bert enjoyed seeing a bunch of familiar faces and a few new ones too. Plus he got his first Christmas presents and what kid doesn't like that?

As if the weekend weren't already jam-packed, Bert fit in a little outdoors time. First he tried on Uncle Travis's hat but decided it was warm enough out that he didn't need it.


Then he tried to take Popper's new Rhino for a spin but he had a little trouble reaching the pedals.


He wasn't much more successful in Memere's kayak, considering the lack of a paddle and water.


He wrapped the weekend up with a good nap on the ride home yesterday afternoon and went to bed without a fuss and slept through the night. I would venture to guess that all the action wore him out. That or it was the second-hand tryptophan from all the leftover turkey I ate.

Wednesday, November 23, 2011

The Countdown is On

Thanksgiving is tomorrow, but the real story is that Christmas is just around the corner. Thanks to a "mom's night" I was invited to and a super-crafty mom and fellow blogger, we have a cool advent calendar to count down with.


I filled ours with candy. (Sorry Bert, no treats for you.) Keith was ready to start open boxes last night but I'm making him wait.

Check out Katydid and Kid for instructions on how to make this and enter the giveaway and you might just get all the supplies too!

Tuesday, November 22, 2011

Jenny Appleseed

You already know all about our posts and planned apple tree fence. Well, we are one step closer to being done. Last week, the apple trees arrived.

Let me back up a minute. A few days after we got all the posts in, Bert and I took a drive to a local garden center that was having some super-deep discounts on perennials. That combined with a coupon made outfitting our fence row with some color very affordable. We picked out about a dozen or so various plants: a combination of day lilies, coneflowers, daisy-like flowers, sedum, and a few other things I can't remember the names of now. Keith told me to put the plants where I wanted them so I staggered them here and there, leaving spaces for the trees we were still waiting on. He dug holes and planted them. Bert and I kept him company for awhile since it was a mild evening (this was early in October) but we headed in as it got dark and the mosquitos (yes, mosquitos) came out, leaving Keith to get eaten alive. He also moved a rose that we have been nursing for two years from a slip my grandmother started off her rosebush next to the post closest to the house.


Being the helpful and forward thinking guy that he is, Keith went ahead and dug the holes for the trees so planting them would be quick work. He also brought home a load of mulch to spread around our fence row. So when this big box arrived last week, I was ready to plop our trees in the ground.


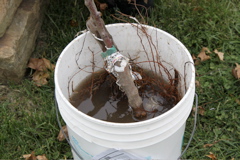
The instructions that came with the trees recommended soaking the roots in water for a few hours before planting, so I plunked them in a bucket immediately.


Then, when Bert went down for his nap, I headed outside. He was still fussing when I went out but we are working on getting him to go to sleep on his own. Fifteen minutes later when I checked on him, he was out. That fifteen minutes sure goes a lot quicker when you aren't inside listening to the crying.

Anyway, I had to dig out the holes to make them a bit bigger. The booklet says, "Old-time gardeners say you need a ten-dollar hole for a five-dollar tree." I'm no expert but I think that means to give those roots some room. So the trees are in their ten-dollar holes with some good top soil filled in around them. The other suggestion was that the dirt should be banked so that water would run away from the trunk, not pool and freeze. There was also a lot of mumbo-jumbo about pH balanced soil and such that I skipped over, so here's hoping that they are healthy and happy in the ground and survive the winter. I think they'll be ok because we've been told that the previous owners used to have a number of fruit trees in the yard that did quite well.


All that has to be done yet is to string wire along the post to train the branches on as the trees go and to plant two mums that our neighbor gave us after taking down her fall decorations. Hopefully we will have wonderful pictures of tiny leaves on our trees to share in the spring!

Friday, November 18, 2011

The Dirt on Bert

As promised, here are Bert's current stats:

Age: 4 months
Weight: 16 lbs. 6 oz.
Length: 25.5"
Head Circumference: 16.25"

According to the doctor's charts, his weight and length are in the 75th percentile and his head is in the 50th. Everything checked out just fine and he is one healthy, mostly happy, little boy. Now there's something to be thankful for this Thanksgiving.

And now some recent pictures of our not-so-little-anymore little boy.


We started him on rice cereal this week, giving him a small bowl each day. He was really excited about it the first time and less enthusiastic the next couple times!

I think he looks like a completely different baby when he wears a hat and when he doesn't. Kind of like Kenny Chesney...

Thursday, November 17, 2011

Chilly Day Comfort Food

Here's a super-simple recipe that Keith and I really enjoy. It is from Real Simple a couple years ago and I've made it a number of times.

Easy Shepherd's Pie


1 pound ground beef
1/3 c. ketchup
1 tsp. Worcestershire sauce
8 oz. frozen mixed vegetables (such as carrots, peas, and corn), thawed
1/4 c. shredded Cheddar (optional)
1 16-oz. package refrigerated or frozen and thawed mashed potatoes

Heat oven to 400 degrees. Place the beef in a large skillet and cook over medium-high heat until no trace of pink remains, about 5 minutes. Spoon off and discard any fat. Stir in the ketchup and Worcestershire. Add the vegetables and cook, stirring, for 1 minute. Spoon the beef mixture into a baking dish. Mix the cheese (if using) with the potatoes in a medium bowl. Spread the potatoes over the beef and bake until heated through, 10 minutes. Divide among individual plates.

So that's the basic recipe. I departed a little bit from it. First, I used ground turkey.


Then I used way more vegetables than the recipe calls for. We had peas and corn frozen, so I thawed them out and then realized I had some carrots and celery in the fridge that needed to be used up, so I went ahead and threw them in too.


Then I made my own mashed potatoes because, well, it's cheaper than buying a tub of the refrigerated kind. And I'm cheap.


So the point is the recipe is really easy to adapt and cooking is more fun when it's a bit of an adventure. And Keith agrees. Most of the time.

Related Posts Plugin for WordPress, Blogger...