Showing posts with label Recipes. Show all posts

Thursday, November 13, 2014

How 'Bout Them Apples?

Really? Nearly two weeks since I posted anything? The days have been flying by, a quick succession of appointments, playgroup, and a few days spent at my parents' making applesauce. We are pretty well stocked with applesauce for the year, with our share being 28 quarts. Though these growing boys would probably eat two quarts a week if I let them. I try to keep us to using only one a week, figuring that carries us through the winter, nearly up to the time lettuce, radishes, and the very earliest strawberries start appearing. I have a feeling in the next few years, we'll have to ramp up production.

Besides bringing home applesauce, we brought back a bunch of fresh apples. While the boys have been munching on them and eating them in oatmeal, I was excited to find a recipe that incorporated them into a main dish.


Apple Chicken Tart
(adapted from a Giant grocery store magazine)

1 recipe pizza dough (below)
1 Tbsp. olive oil
1 medium onion, very thinly sliced (the original recipe called for a large sweet onion, so if you like onion and have a sweet one on hand, go for it!)
1/2 tsp. dried thyme leaves or 1/4 tsp. ground thyme
1 large Red Delicious apple, unpeeled and thinly sliced
1/4 tsp. salt
1/4 tsp. black pepper
2 cups shredded cooked chicken
2 Tbsp. sliced green onions
1/2 c. shredded cheddar cheese

Pizza Dough
(Hmmm...can't remember where I cut this one out of but it is our favorite pizza dough recipe)
3/4 c. warm water
1 Tbsp. active dry yeast
2 c. (or more) flour (I usually do one white, and one whole wheat or multi-grain)
1 tsp. sugar
3/4 tsp. salt
3 Tbsp. olive oil

Combine 3/4 c. water and yeast; stir and let stand until yeast dissolves, about 5 minutes. In a large bowl, combine 2 cups flour, sugar and salt. Add yeast mixture and olive oil, stir until dough forms a sticky ball. Transfer to a lightly floured surface and knead until smooth, adding more flour if dough is very sticky. Knead for about 1 minute. Place in greased bowl, cover with plastic wrap and let dough rise about 1 hour, until doubled.

Now, on to the real recipe...

1. Prepare dough as above. Preheat oven to 450˚F.

2. Stretch or roll dough to fit a 12-inch circular pizza pan or a 13 x 9-inch rectangle cookie sheet. Place dough on lightly greased pan.

3. Bake for 10 minutes or until dough is crisp, slightly browned and firm.

4. While dough is baking, heat oil in large skillet over medium heat. Add onions and thyme; cook until soft, about 15 minutes. During the last 5 minutes, add apple, stirring occasionally, until soft and golden.

5. Layer onions, apples, and cooked chicken over crust and season with salt and pepper. Top with cheese and green onion and return to oven for 5 minutes until cheese is melted.

6. Cut and serve.

I only put cheese on half the tart so Elliott could eat it too, but the melty cheese definitely helps hold all the toppings on. It was just as easy to make as a regular pizza, but a nice change in flavor.

Monday, August 4, 2014

Cabbage Salad

My mom-mom shared a new cabbage salad recipe with us, and I'm kind of in love. Keith likes it too, but says it's still a tie with the coleslaw I often make. I think this salad actually holds up better over the course of a couple days, and soaks up more of the flavor, which is nice because it usually takes us that long to get through it.


4th of July Cabbage Salad
from my mom-mom's friend Jane

Toss together:

1 head of cabbage, chopped or shredded, or 1 bag of coleslaw
4-5 scallions, sliced
1-2 cups toasted almonds (I went with about 1 cup slivered almonds; Mom-mom says peanuts work too)
2 Tbsp sesame seeds (optional – I put in sunflower seeds because I had them on hand)
1 package chicken-flavored ramen noodles, broken into pieces

Mix dressing together:
Flavoring packet from noodles
1/2 cup vegetable oil
3 Tbsp white vinegar
1 tsp salt
1 tsp pepper

Pour dressing over cabbage mixture and toss together.

Friday, July 18, 2014

We'll Drink to That

It's official: we have too many cucumbers. How do I know? Because, as of last night, we have started using them in cocktails.

Actually, our cucumbers are one of those catch-22 things; more than we can eat as they come on, not enough to really get into making pickles. Though I did get a small-batch canning book this year and want to try that recipe for dill pickles.

Back to the booze.

Cucumber and Basil Gimlet
from Real Simple, August 2014

Muddle 1/4 cup sugar with 1/2 chopped English cucumber or 2 small Persian cucumbers, skins and all, in a pitcher. (We just used a medium, nice and firm, pickling cucumber.) 

Mom, we used the spurtle!


Add 2/3 cup fresh lime juice and stir to dissolve the sugar.


Add 2/3 cup gin or vodka (gin for us) and 1/4 cup water and stir to combine.


Divide among 4 glasses. Top with ice and garnish with fresh basil. (Why didn't I pull out two matching glasses? Nobody will be pinning that one...)


So...there was just the two of us. So...we just poured it in two glasses. It should serve four, because it's pretty potent. I enjoyed it, but couldn't finish my double. Next time we'll make it when there are other people around!

Friday, May 30, 2014

Cluck Cluck Cauliflower

Continuing with our new recipe search, I picked up a cookbook at the library called Almost Meatless. It has some really great ideas for slimming down the amount of meat in recipes while maintaining great flavor. Well, if the first recipe we tried is any indication, it does all that. And their food photography is much better than mine, so don't let that scare you away!


Chicken and Curried Cauliflower Salad Sandwiches
adapted from Almost Meatless

1 medium head of cauliflower, chopped into 2-inch pieces (about 6 cups)
1 Tbsp. plus 1 tsp. canola oil
1 tsp. curry powder
salt and pepper
1 large chicken breast
1/2-3/4 c. mayonnaise
1/2 tsp. curry powder
1/3 c. salted roasted nuts (I used peanuts, the original recipe called for cashews)
1/3 c. raisins
Bread slices, toasted, for making sandwiches

Preheat oven to 400˚. Toss the cauliflower with 1 Tbsp. oil, 1 tsp. curry powder, and 1/4 tsp. salt.  Arrange in a single layer on a rimmed baking sheet or in a glass baking dish. Put the chicken in a roasting pan or on a rimmed baking sheet; brush with the remaining oil and season with salt and pepper. Put both in oven. Roast the cauliflower for 20 minutes. Remove from oven and let cool. Let the chicken roast for an additional 10-15 minutes (30-35 minutes total), until cooked thoroughly. Remove from oven and cool.

Add 1/2 tsp. curry powder to mayo. When cauliflower and chicken are cool, dice chicken in 1/2-inch pieces and roughly chop cauliflower so pieces are no larger than 1/2-inch. Combine chicken, cauliflower, mayo, nuts, and raisins, and toss until well mixed. Season with more curry, salt or pepper if needed (I used a bit of garlic powder too). Scoop onto toasted bread and serve.

Keith and I both really liked this one, and I was pleasantly surprised that Colter dug in too. I think it helps that he was in the kitchen with me and sampled each thing as it was going in so having it all mixed together didn't throw him off. I know having kids in the kitchen to help them become better eaters isn't a new idea, but I am always amazed by how much more excited Colter is to eat when he gets to help with the meal prep, especially when it comes to new or different flavors.

Monday, May 26, 2014

Whatcha Got Cookin'?

Elliott is moving all over the place and got into Colter's kitchen things, which prompted Colter to put the chef's hat on his little brother.


A good look, yes?


They might look good cooking but they aren't so productive so let's move on to real food. Keith and I have been talking quite a bit lately about how we eat and what we eat. With a couple of things in mind – health, expense, and sustainability, with health being the biggest factor – we're looking to shake up our diet. Keith was initially curious about a Mediterranean diet, with all the heart-health benefits that it are associated with, but as we explored that a bit, traditional Mediterranean recipes don't really jive with what is available locally and seasonally. The main focus there is loads of vegetables and lots of whole grains, and more fish, less meat. That we could do. So the current meal-planning goal is to have fish once a week, one meatless meal a week, and only one meat-centered meal each week (think meatloaf or a roast). The other nights can have meat (concentrating more on chicken or turkey, or small servings of beef or pork) but should be loaded up with vegetables.

So, that's a really long way of saying we are on the lookout for new recipes that fit these goals, and I'll be sharing some of them here. First up, one my mom made when we were up to visit at Easter and we both really enjoyed, and is perfect for our meat-free days. I went ahead and made a double batch and put some in the freezer for a quick and healthy meal another day.


Sweet Potato and Black Bean Chili

2 Tbsp. vegetable oil
1 large onion, chopped
1 Tbsp. chili powder
1/2 tsp. cumin
1-2 tsp. dried cilantro (optional)
2 c. broth (I used chicken but I'm sure vegetable would be fine, and truly meat-free)
2 medium sweet potatoes, peeled and cubed
2 - 14.5 oz. cans diced tomatoes, in juice
1 - 15.5 oz can black beans, rinsed and drained

Cook onion in vegetable oil until softened, about 5 minutes. Stir in chili powder, cumin, and cilantro. Add broth and sweet potatoes; bring to a gentle boil and simmer until tender, about 15 minutes. Add diced tomatoes and black beans; simmer until slightly thickened, about 15 minutes.

With a nice roll on the side and a bit of sour cream on top, it was a really filling meal. Colter even devoured the sweet potatoes and beans.

Monday, March 3, 2014

Supper Splurge

Before my mom came to visit a few weeks ago, I was flipping through my recipe box, trying to plan some meals for while she was here. I came across a recipe I had cut out more than a year ago and decided to try it the evening Keith had his class. It was a hit and since I had the ingredients on hand, I made it again a couple of nights later for Keith and I.


Prosciutto and Cheese Tartine
from Cooking Light, April 2012 (with a couple little changes)

1/2 cup warm water
1 tsp. sugar
1 Tbsp. or 1 package dry yeast
1 1/4 cups all-purpose flour
3 Tbsp. olive oil, divided
5/8 tsp. salt, divided
1/4 tsp. black pepper
Cooking spray
1/2 cup coarsely chopped walnuts
1/3 cup very thinly sliced red onion
2 cups arugula
1 tsp. fresh lemon juice
4 slices (about 2 oz.) very thinly sliced prosciutto
1 ounce fresh Parmesan cheese, shaved or shredded

1. Preheat oven to 450˚.

2. Combine water, sugar, and yeast in a medium bowl, and let stand for 5 minutes or until bubbly. Stir 4 teaspoons olive oil into yeast mixture. Add flour, 1/4 teaspoon salt, and 1/4 teaspoon black pepper to yeast mixture, stirring until a soft dough forms. Knead dough on a lightly floured surface until smooth and elastic (dough will be soft and tacky).

3. Place dough in a large bowl coated with cooking spray, turning to coat top. Cover and let rise in a warm place, 45 minutes or until doubled in size. Punch dough down; cover and let rest 5 minutes.

4. Drizzle 2 teaspoons  oil into an 11 x 7-inch glass or ceramic baking dish. Press dough into dish. Cover loosely with plastic wrap, and let rise in a warm place, 30 minutes or until puffy; sprinkle dough with 1/4 teaspoon salt, nuts, and onion. Bake at 450˚ for 18 minutes or until golden.

5. Place arugula in a bowl; drizzle with remaining 1 tablespoon olive oil and lemon juice. Toss. Turn bread out on to a work surface. Slice bread into 4 rectangles (7 x 2 3/4"); top with prosciutto, 1/2 cup arugula mixture; sprinkle with salt and top with cheese.


The first night, my mom and I each ate half for supper. When I made it for Keith, we had some soup and each had one piece of the bread, saving the rest for the next day. On its own, it makes for a nice, light meal but works really well with soup too. I might even make just the bread more often to accompany some of our favorite soups. 

The prosciutto can get a little pricey, but I found it prepackaged and on sale. I opted to use Parmesan rather than the Parmigiano-Reggiano the original recipe called for since it was $4 a wedge versus $8. As I was buying the arugula, cheese and prosciutto, I thought it seemed expensive but since we got two rounds out of everything, it wasn't so bad.  We used the rest of the arugula in place of lettuce in sandwiches and taco salads, and have been enjoying fresh Parmesan on pasta. Not much has a chance to go to waste around here!

Saturday, February 22, 2014

Baking My Way Through Winter

I can't be the only one who, when the winter seems long and cold and we are in the house for days on end, retreats to the kitchen in search of something sweet. This winter, most of my baking is coming from this book, a Christmas gift from my mom:


I have not been taking pictures and posting the recipes because I'm pretty sure posting each one as I bake my way through the book would constitute copyright infringement. But here's a glimpse of what we've been satisfying our sweet tooths (sweet teeth?) with.

The first was a chocolate fudge pie with praline crumble.


The most recent is a sweet buttermilk pie.


In between, there has been a pair of apple pies (one for the kind neighbor who uses his snowblower to help us clear out after every single storm), a roasted sweet potato cobbler, a mocha fudge cobbler, and chocolate chess pie bites. And some chocolate chip cookies. There have been no disappointments; just varying levels of decadence. 

Someone check on me come spring; I may need to be rolled out the door.

Thursday, January 23, 2014

Bourbon Balls

Every year at Christmas, my Mom-mom makes one of Keith's favorite holiday treats: bourbon balls. They are incredibly simple, and pack a bit of a punch. We made a batch to take to our friends' house on New Year's Eve, so Keith actually got to enjoy them twice in one holiday season!

Bourbon Balls

2 1/2 cups finely crushed vanilla wafers (about 10 ounces)
1 1/4 cups confectioners' sugar
2 Tbsp. finely ground hazelnuts
1/4 cup bourbon
2 Tbsp. unsweetened cocoa powder
3 Tbsp. corn syrup
1/3 cup granulated sugar

1. Mix crumbs, confectioners' sugar, hazelnuts, bourbon, cocoa, and corn syrup in medium-sized bowl.
(I put the vanilla wafers and hazelnuts in my food processor to crush/grind them.)

2. Press all ingredients in bowl together to form a large ball.


3. Shape into balls, 1 tablespoon each; place on waxed paper.

4. Place granulated sugar in a small, shallow dish. Roll small balls in sugar to coat. Place in a tightly cover container for at least 24 hours for flavors to develop.


Make-ahead tip: Store in tightly covered container in a cool place up to several weeks.

I bet Mom-mom likes this recipe because she can make it ahead of time and get it crossed off her holiday list early!

Ok, I think that officially wraps up posts regarding the holidays...

Monday, November 25, 2013

Now That's a Pie

My mom says, "I found a recipe for a Candy Apple Pie. Doesn't that sound good?"

I say, "Um, yeah!"

Then she bakes it for us. Twice.

Then we have friends coming over and I bake it.

I'd say it's a keeper. I didn't even get a picture before I cut into, which is a shame because it was a really pretty pie.


Candy Apple Pie
(Maybe from Lancaster Farming? Maybe from a decade ago?)

6 c. thinly sliced, peeled baking apples (that's about 4 large ones; don't be afraid to fill it up!)
2 Tbsp. lime juice (optional...I left it out)
3/4 c. sugar
1/4 c. all purpose flour
1/2 tsp. salt
Pastry for double-crust pie (9")
2 Tbsp. butter

Topping:
1/4 c. butter
1/2 c. packed brown sugar
2 Tbsp. heavy cream
1/2 c. chopped pecans

In a large bowl, toss apples with lime juice (if using). Combing dry ingredients; add to the apples and toss lightly. Place bottom pastry in a 9" pie plate; fill with apple mixture. Dot with butter. Cover with top crust. Flute edges high; cut steam vents. Bake at 400˚ for 40-45 minutes.

Meanwhile, for topping, melt butter in a small saucepan. Stir in brown sugar and cream. Bring to boil, stirring constantly. Remove from heat and stir in pecans. Pour over top crust. Return to the oven for 3 to 4 minutes or until bubbly. Serve warm Yields 8 servings.

So if you were looking for an idea for a Thanksgiving dessert, this one would fit the bill. And don't be afraid to whip up the rest of your container of heavy cream with a little vanilla and powdered sugar and put some of that on top of the pie too. Just an idea...

Saturday, October 12, 2013

Pumpkin Recipes, from Before the Lil' Pumpkin Arrived

Back before the new little man arrived, I was on a baking kick. And being as fall had begun (even if we had some 85˚ days), pumpkin was on my mind. So, pumpkin bread it was. And you should be able to guess how good it was, considering that the loaf was half gone before I was able to get a picture of it!

Pumpkin Bread
Real Simple, October 2013


1/2 c. canola oil, plus more for pan
1 3/4 c. all-purpose flour
1 tsp. baking powder
1/2 tsp. pumpkin pie spice
1/2 tsp. fine salt
1/4 tsp. baking soda
1 c. pure pumpkin puree
3/4 c. granulated sugar
1/4 c. packed light brown sugar
1 large egg
1 tsp. pure vanilla extract

Heat oven to 350˚. Lightly oil loaf pan. Whisk together the pumpkin puree, granulated sugar, brown sugar, oil, egg, and vanilla. Add the dry ingredients and mix until just combined (do not over mix). Pour into loaf pan; bake until a toothpick inserted in the center comes out clean, 55 to 60 minutes. Let cool in pan for 15 minutes, then transfer to a wire rack to finish cooling.

If you want, you can make an icing to drizzle on the top by combining the following:
3/4 c. confectioners' sugar
2 Tbsp. sour cream
1/4 tsp. fresh lemon juice
(I skipped the icing but I'm sure it would be really tasty without being as heavy as a cream cheese icing.)

Now that you've got that can of pumpkin open, try this out.

Pumpkin Baked Oatmeal
(My own reworking of a recipe!)

Remainder of can of pumpkin after making recipe above (about 3/4 c. – this replaces the 1/2 c. oil in the original recipe)
2 beaten eggs
1 c. sugar
3 c. oatmeal (1 c. quick oats, 2 c. rolled oats)
2 heaping tsp. baking powder
1 tsp. salt
1 c. milk
1 tsp. vanilla
1 tsp. pumpkin pie spice (or more if you want more flavor)

Combine all ingredients and bake in a greased glass baking dish for 25 to 30 minutes at 350˚. Serve any way you like – I like it warm with some milk poured over it but it can be eaten cold as is.

Happy fall!

Wednesday, September 25, 2013

Peppy Peppers

Often on the weekends, I try to do something a little special for breakfast. Nothing elaborate, but something beyond our usual toast or yogurt and granola.

This past weekend, it was Bell-Pepper Egg Flowers. I saw the recipe in a Parents magazine earlier this summer, and wanted to try it. Our peppers were a little slow this year, but we had a bunch come on last week and I decided to give this a shot.


Basically, all you need to do is heat some vegetable oil, about 2 teaspoons, in a pan. Slice your bell peppers into approximately 1/2" rounds. Mine were a little smaller, so I cut them closer to 3/4" thick. Lay the rings in the pan and cook for about 2 minutes. Then flip them and crack an egg inside each one. Cover the pan and cook for 6 minutes or until yolks are firm. The recipe didn't say to flip them after the eggs had cooked a bit, but I did because nobody in this household likes their eggs runny at all. 


Mine ran out the bottom a bit, but ended up flipping without a problem.


Some looked prettier than others, though none of them looked quite like the magazine photo (which has terrible glare here).


The recipe also suggested sprinkling a bit of Parmesan cheese on top. We skipped the cheese and just ate ours with toast. We had one left over and it actually reheated nicely the next day, which surprised me. I thought Bert would get more of a kick out of this, but I don't think he quite made the connection that it was supposed to look like a flower, and he was a little put off by a fried egg when he is used to scrambled. Oh well, maybe next year.

Thursday, September 19, 2013

Nesting? Maybe?

My mom asked me a week or so ago if I thought I was nesting at all. No, I replied, just trying to stay on top of the day-to-day stuff. Then I found myself baking two days in a row and wandering the house with a can of Pledge and a dusting rag. So yeah, maybe I'm nesting. The house isn't spotless, but we are enjoying some fall-flavored goodies.

On Friday, I baked some muffins.


Spiced Carrot Muffins
Everyday Food, Jan/Feb 2004

1 3/4 c. all-purpose flour
1/2 c. sugar
2 tsp. pumpkin pie spice
2 tsp. baking powder
3/4 tsp. baking soda
1/2 tsp. salt
3/4 c. plain yogurt (I only had fat-free French Vanilla on hand but that worked fine)
4 Tbsp. unsalted butter, melted
1 large egg
2 c. peeled, shredded carrots (about 5 medium; I highly recommend using a food processor to shred them – so much quicker!)

1. Line 12 cups of a standard muffin tin with paper liners. In a large bowl, stir together flour, sugar, spice, baking powder, baking soda, and salt; set aside.

2. In a separate bowl, whisk together yogurt, butter, and egg. Make a well in the center of the dry ingredients and add yogurt mixture. Stir until just combined. Fold in carrots.

3. Spoon batter into prepared muffin cups (about 3/4 full). Bake at 375˚ for about 20 minutes.

Since I was dirtying the food processor and a couple of bowls, I opted to double the recipe and froze about half of what I made for later.

Then on Saturday, I made mini pumpkin croissants. Bert hasn't stopped asking for "puppin rolls" since.


Rather than type out that whole recipe, click here for the link. Simple and quick. You are going to have plenty of leftover filling; I actually used three cans of crescent rolls and still had about a cup of filling left. We've been eating it on bagels and toast, and Bert likes dipping animal crackers in it. We've also been enjoying it stirred into plain oatmeal for breakfast.

Thursday, September 12, 2013

Having a Ball

Summer is rapidly coming to a close and while I'm ready to say good-bye to hot and humid weather, there are things I love about summer that I will miss. Towards the top of that list is ice cream, especially of the homemade variety. We only managed to make strawberry ice cream this summer, due to a snafu with our ice cream freezer (motor burn out, we think). But when I came across a recipe for vanilla bean ice cream that made a single quart and I actually had vanilla beans on hand, it was the perfect opportunity to finally pull out our ice cream ball. Finally as in my mom gave it to me as a birthday or Christmas gift several years ago, and we hadn't used it yet. (Sorry, Mommy!)

Vanilla Bean Ice Cream
from Cooking Light

1 cup half-and-half
1/2 cup sugar, divided
2 Tbsp. light-colored corn syrup
1/8 tsp. salt
1 (12-ounce) can evaporated low-fat milk
1 vanilla bean, split lengthwise
3 large egg yolks

Combine the half-and-half, 1/4 cup sugar, corn syrup, salt, and evaporated milk in a medium heavy saucepan. Scrape seeds from vanilla bean; add seeds and bean to milk mixture. Heat milk mixture to 180˚ or until tiny bubbles form around edge (do not boil). Remove pan from heat; cover and let stand 10 minutes. Combine remaining 1/4 cup sugar and egg yolks in a medium bowl, stirring well with a whisk. Gradually add hot milk mixture to egg mixture, stirring constantly with a whisk. Return milk mixture to pan. Cook over medium heat until a thermometer registers 160˚, stirring constantly. Remove from heat. Place pan in a large ice-filled bowl for 20 minutes or until egg mixture is cool, stirring occasionally.


Pour milk mixture through a fine sieve in the freezer of an ice cream freezer; discard solids.


Freeze according to manufacturer's instructions. Spoon ice cream into a freezer-safe container; cover and freeze 3 hours or until firm.

And this is where the fun started. It only took about 20 minutes of playing with the ball in the yard to get the ice cream to freeze, and it ended up more solid than homemade ice cream done in a traditional freezer usually does. We stopped once to scrape the sides down like the ball's instructions recommended.


Bert got a kick out of rolling it down the hill.


And rolling it back up.


And down again.


And then he was done.


Ready to scoop!


Ready to eat!


Does this face say "delicious" to you?


The ice cream tasted great, and we got to work a bit of it off before we chowed down. We were surprised how firm the ice cream got in the ball, and that it only took about 20 minutes since the instructions said 30 to 35 minutes. But no complaints here for getting our ice cream faster than we expected!

Tuesday, August 27, 2013

Nuke It

Keith and I are a couple of snackers, especially in the evening after a certain little mooch goes to bed and we take up residence on the couch. I'm often looking for something sweet, and Keith usually tends towards salty and crunchy.

Though I've been eating a lot of ice cream this summer (it is on the doctor's list for good sources of calcium, so doctor's orders!), one of the cool evenings recently I was in the mood for something more along the lines of cake. But since we generally don't have cake sitting around waiting for my cravings, I thought I was out of luck. I got to thinking about how a couple years ago, I noticed those microwavable single-serving cakes in the grocery store, probably a Betty Crocker or Duncan Hines product. Somebody had to have figured out how to make them at home, right? After a little searching online, I found a simple recipe for microwave cake in a mug. Five minutes later, I was satisfying that cake craving.

Microwave Chocolate Cake in a Mug

4 Tbsp. white flour
4 Tbsp. sugar
2 Tbsp. baking cocoa
1/4 tsp. baking powder
1 egg
3 Tbsp. milk
3 Tbsp. oil
3 Tbsp. chocolate chips (optional)
Small splash of vanilla

Put dry ingredients in a large mug and mix well.


Add egg and mix.


Add milk and oil and mix well. Then add chocolate chips and vanilla, mixing for a final time.


Microwave for 2 1/2 to 3 minutes. It looks like it is going to overflow the mug, but it just kind of rises straight out and sinks back down when done.


And there you have it, cake in a mug. The chocolate chips sink to the bottom and stay very warm so be careful! Also, the mug is pretty hot, so grab a pot holder or something to hold onto it. It's big enough to share, especially if you are topping it with ice cream. I shared mine with the baby.


As for Keith and his snacking, he has been into popcorn lately. I had been buying the store brand of light microwavable popcorn, at a little under $2 for three bags. Not expensive per se, but since he was eating a bag almost every night, it was adding up. Then someone (was it you, Mom-mom?) told us about microwaving popcorn in a brown paper lunch bag. So simple, and much cheaper. For about the same price as three bags of popcorn, we bought a bag of loose popcorn kernels that makes about 24 servings. Here's the run down:

Place approximately 1/4 cup of popcorn kernels in a brown paper lunch bag.


Add a bit of salt.


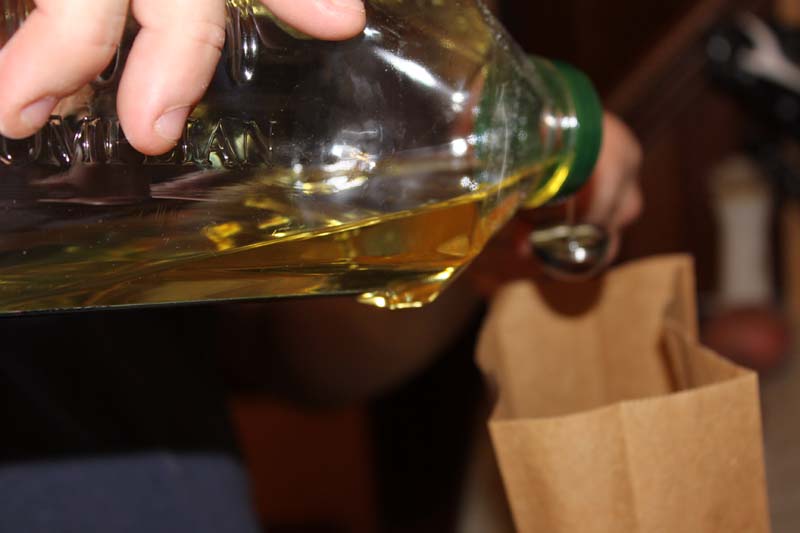
Add 2 teaspoons of olive oil.


Fold the top of the bag over and staple shut. (Isn't that tiny stapler handy? Found it among some stuff in my office and now it lives in the pantry next to the popcorn just for this purpose.)


Shake to mix. Your bag will get oily so when you put it in the microwave, it doesn't hurt to put a paper towel or paper plate underneath.


Pop for about 2 1/2 minutes, listening for the popping to slow just like you would with a regular bag of popcorn.


Enjoy! Keith likes to sprinkle a little parmesan cheese on his for some added flavor, and you could certainly get creative, trying things like Old Bay seasoning or some herbs or something.


And now you know how exciting life gets here on the quarter-acre on a typical night.
Related Posts Plugin for WordPress, Blogger...