File this under "stop putting off projects that really won't take that long." A month or so ago, we decided to put up the blinds in the laundry room. We bought them before Elliott was born but never mind that point. So we got started, only to discover that we didn't like the hanging hardware that came with the blinds. Actually, we might have resigned ourselves to so-so hardware if one of the hooks hadn't broken off when we went to install the second of the five blinds.
So, with a broken hook in hand, we left the one blind up and put the rest back in the box until we could get more hooks. Eventually, Keith made a run to the hardware store and picked up a couple packs of small white cup hooks, which look a lot better and blend into the trim nicely instead of the long, brassy hooks that came with the blinds. Then it only took us a couple more weeks to get back to hanging the blinds, a job which took all of about half an hour and we should not have procrastinated on.
The photos aren't great, but we are really happy with how they look. They work nicely with the red walls and add a ton of texture, without darkening up the room much at all. Though we will probably leave them in the middle position like they are in the photos most of the time, it's nice to be able to put them down if the sun is really beating on the room back there, which it does in the summer. The last thing we need to do is add some cord hangers to wrap the cords around so they are out of reach of little hands. Right now, they are just tucked up in-between the slats. The blinds came with that hardware but again, it is really brassy so we might spray paint them white before putting them up. You know, in another six months or so...
Showing posts with label Inside Projects. Show all posts
Wednesday, March 19, 2014
Monday, February 10, 2014
Chalk It Up
Chalkboards and chalkboard paint seem to be all the rage recently. So while I certainly didn't start the trend, I did have a chalkboard before they became a big thing. I just didn't do anything with it for more than a year. (That seems to be a recurring theme around here...)
Over a year ago, I bought a small chalkboard at a flea market. I thought we would make a frame for around it and hang it in the dining room near all the toys, but we went a much simpler route and used mirror clips to attach it to the wall and ultimately decided to put it in the kitchen.
This is the response I got when I said, "Go show me how you use your chalkboard!"
Too early in the morning, perhaps? I know it was before my cup of coffee. And he never got out of his pajamas that day either.
The last thing I want to do is attach one of those Scrabble tile holders below the board to be a little chalk ledge.
Over a year ago, I bought a small chalkboard at a flea market. I thought we would make a frame for around it and hang it in the dining room near all the toys, but we went a much simpler route and used mirror clips to attach it to the wall and ultimately decided to put it in the kitchen.
This is the response I got when I said, "Go show me how you use your chalkboard!"
Too early in the morning, perhaps? I know it was before my cup of coffee. And he never got out of his pajamas that day either.
The last thing I want to do is attach one of those Scrabble tile holders below the board to be a little chalk ledge.
Monday, January 27, 2014
Feeling Shelf-ish
As you well know, the laundry room is a work in progress. A long, slow progress, but progress nonetheless. The latest changes have been adding a shelf and putting up a drying rack.
The placement is a little odd because of the location of the outlets. Ideally, it would have gone right above the top of the washer and dryer, but we had to put it up higher, which is why we sprung for a little fancier brackets since we would see them all the time. We didn't even float the idea of moving the outlets because that just seemed like a lot more bother than it was worth.
Either way, all the laundry supplies are within easy reach and no longer clutter up the top of the dryer. And there is a bit of space for a few plants, since this room gets a lot of light. It took less than a minute to fill up the shelf. Go figure.
Then we finally put up the drying rack my friend gave me for my birthday at least a year ago. Now I'm trying to figure out how we lived without it. It is so handy for drying diaper covers and other delicates I don't want to put in the dryer, and for putting wet mittens, gloves, and hats on when we come in from playing in the snow.
It is high enough that we can walk under it, but really it doesn't stick out so much that it's in the way.
And it folds up nice and flat when we aren't using it. Which has rarely happened since we put it up.
We picked up brackets at Lowe's months ago, then got a board from the farm when we were up just after Christmas. We finished it was some spar urethane to seal it up, then installed it.
The placement is a little odd because of the location of the outlets. Ideally, it would have gone right above the top of the washer and dryer, but we had to put it up higher, which is why we sprung for a little fancier brackets since we would see them all the time. We didn't even float the idea of moving the outlets because that just seemed like a lot more bother than it was worth.
Either way, all the laundry supplies are within easy reach and no longer clutter up the top of the dryer. And there is a bit of space for a few plants, since this room gets a lot of light. It took less than a minute to fill up the shelf. Go figure.
Then we finally put up the drying rack my friend gave me for my birthday at least a year ago. Now I'm trying to figure out how we lived without it. It is so handy for drying diaper covers and other delicates I don't want to put in the dryer, and for putting wet mittens, gloves, and hats on when we come in from playing in the snow.
It is high enough that we can walk under it, but really it doesn't stick out so much that it's in the way.
And it folds up nice and flat when we aren't using it. Which has rarely happened since we put it up.
Considering how much laundry I do these days, these little changes make a big difference in my daily routines. Now I don't have to shuffle things around on top of the dryer, or find random places to lay out diaper covers while they dry. And that makes this mama happy.
Friday, January 10, 2014
Little Fixes
I say these are little fixes, but then I'm not the one who had to make them. Keith would tell you they were a pain in the neck (literally) and he knows why people hire professionals.
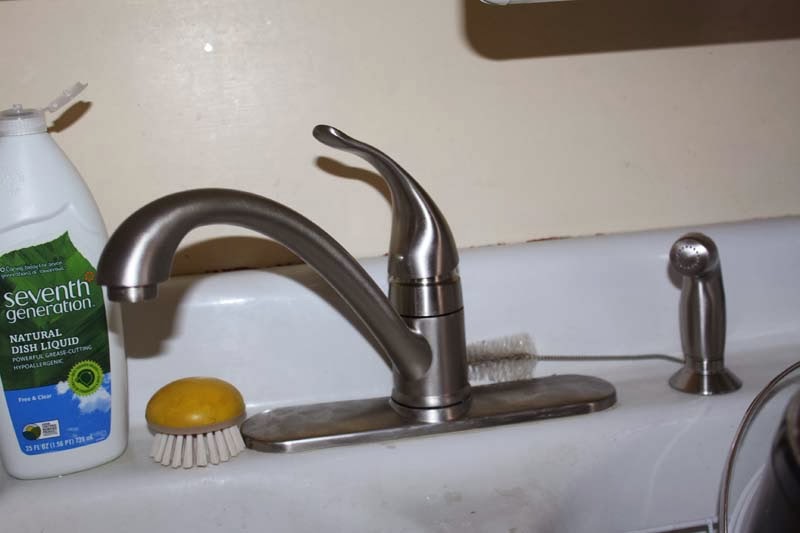
First, our kitchen faucet has been leaking for a long time. We had a plumber here nearly a year ago to do some other work (work that was truly to be left to a professional) and he looked at it and told Keith it was a simple fix that Keith could do and gave him a part number for the replacement piece. Finally, finally, Keith got around to replacing the cartridge, which was causing the leak. He wanted to wait for a day he could do it all in one shot since the faucet didn't have shut off valves and he would have to turn the water off to the whole house. Well, the better part of a day later, the faucet was leaking worse than ever and it was evident we needed a new faucet (apparently, our hard water build-up was all that was keeping the old faucet together). So he rigged something up to stop the leaking since we were headed to my parents' for the weekend, and while there, we left the boys with my mom for a bit and picked out a new faucet. While we were out, we also picked up a new light for over the sink, since ours has been on the fritz for a long time. Then, after talking over the project with my dad, he decided he could install shut off valves as well and the men made a return trip to Lowe's to get the parts for that.
We left the farm Sunday morning so that Keith could fix the faucet when we got back. After a couple of hours and two more trips to Lowe's for the right parts (and our Lowe's is 20 minutes away), and a whole lot of this:
We finally had this:
And it doesn't leak at all! Also, we gained a sprayer so that is handy too.
The second fix was that light above the sink. When I could get the old one to turn on, it would flicker rapidly, which I called disco dishes because it was like doing dishes under a disco ball. Finally, I gave up using it at all. Replacing the light was a much simpler job than the faucet, only taking an hour or so and no runs for additional parts. I am almost looking forward to doing dishes with it. Almost.
We joked when we got the faucet and then moseyed over to pick out a light that this would be the leaky faucet that spawned a kitchen renovation. That will wait though. It was tough enough to be without my sink for a day, let alone weeks and weeks. But a couple little improvements certainly go a long way!
First, our kitchen faucet has been leaking for a long time. We had a plumber here nearly a year ago to do some other work (work that was truly to be left to a professional) and he looked at it and told Keith it was a simple fix that Keith could do and gave him a part number for the replacement piece. Finally, finally, Keith got around to replacing the cartridge, which was causing the leak. He wanted to wait for a day he could do it all in one shot since the faucet didn't have shut off valves and he would have to turn the water off to the whole house. Well, the better part of a day later, the faucet was leaking worse than ever and it was evident we needed a new faucet (apparently, our hard water build-up was all that was keeping the old faucet together). So he rigged something up to stop the leaking since we were headed to my parents' for the weekend, and while there, we left the boys with my mom for a bit and picked out a new faucet. While we were out, we also picked up a new light for over the sink, since ours has been on the fritz for a long time. Then, after talking over the project with my dad, he decided he could install shut off valves as well and the men made a return trip to Lowe's to get the parts for that.
We left the farm Sunday morning so that Keith could fix the faucet when we got back. After a couple of hours and two more trips to Lowe's for the right parts (and our Lowe's is 20 minutes away), and a whole lot of this:
We finally had this:
And it doesn't leak at all! Also, we gained a sprayer so that is handy too.
The second fix was that light above the sink. When I could get the old one to turn on, it would flicker rapidly, which I called disco dishes because it was like doing dishes under a disco ball. Finally, I gave up using it at all. Replacing the light was a much simpler job than the faucet, only taking an hour or so and no runs for additional parts. I am almost looking forward to doing dishes with it. Almost.
We joked when we got the faucet and then moseyed over to pick out a light that this would be the leaky faucet that spawned a kitchen renovation. That will wait though. It was tough enough to be without my sink for a day, let alone weeks and weeks. But a couple little improvements certainly go a long way!
Monday, November 4, 2013
Laundry Room Update
Hmmm....where did we leave off with the laundry room? I think the last you saw it, the trim had been painted and we were making a final decision on a red for the walls.
Well, the room is red now. Pretty darn close to 49ers red. Maybe Keith will be inspired to do some laundry now? (Actually, laundry is the one household chore I really don't mind at all. Of course, I have had a nice break from cloth diapers so that might be why...) This actually all got done pre-baby, but getting a post together somehow got pushed off. Huh.
We swapped out the mismatched, off-white outlets and light switches for new, clean white ones and what a difference a couple dollar fix makes! We also added new hooks under the shelf and a larger hook to hold the towel above the sink.
Obviously still in need of a shoe solution...but don't they look almost artsy against that bright red wall?
We are planning on adding a shelf above the washer and dryer, though not as high as the other shelf. I want to be able to reach it easily while standing in front of the washer.
Other finishing touches involve the trim around the ceiling, blinds, a better solution for our recycling bins, a mirror above the sink and sewing a "skirt" for around the utility sink. Oh, and the storage bench I desperately want. And eventually a new floor, though that is barely even on our project radar at the moment. I, for one, am just happy to have this room fully functional and seriously spruced up, even though it has a ways to go yet.
Well, the room is red now. Pretty darn close to 49ers red. Maybe Keith will be inspired to do some laundry now? (Actually, laundry is the one household chore I really don't mind at all. Of course, I have had a nice break from cloth diapers so that might be why...) This actually all got done pre-baby, but getting a post together somehow got pushed off. Huh.
We swapped out the mismatched, off-white outlets and light switches for new, clean white ones and what a difference a couple dollar fix makes! We also added new hooks under the shelf and a larger hook to hold the towel above the sink.
Obviously still in need of a shoe solution...but don't they look almost artsy against that bright red wall?
We are planning on adding a shelf above the washer and dryer, though not as high as the other shelf. I want to be able to reach it easily while standing in front of the washer.
Other finishing touches involve the trim around the ceiling, blinds, a better solution for our recycling bins, a mirror above the sink and sewing a "skirt" for around the utility sink. Oh, and the storage bench I desperately want. And eventually a new floor, though that is barely even on our project radar at the moment. I, for one, am just happy to have this room fully functional and seriously spruced up, even though it has a ways to go yet.
Tuesday, August 6, 2013
Update: The Big Boy Room
Bert's been in his big boy room for almost two months now, and am I way overdue for updating you on a few of the finishing touches. We still have a few things to hang on the walls, and perhaps curtains to add, but we are pleased with how things came together.
The art, finally up on the walls. Most of it is old magazine ads and covers from the 20s and 30s. The frames came from Michael's during a buy one, get one free sale.
Maybe not everyone's choice of art for a toddler's room...
A print my dad won at an NRA dinner...

The lamp base was turned by a friend of my dad's and the shade came from Target. The tiny bear next to it was made by my friend Claudia years ago.
A barrel found in Maine for a nightstand.
And the finished quilt! My aunt did a fantastic (and speedy!) job with it.
My dad made Bert a little stool for Christmas, and it works perfectly at the end of his bed for a step up.
Let me show you...
And shelves full of books!
A faux bear skin rug from Cabela's...
The art, finally up on the walls. Most of it is old magazine ads and covers from the 20s and 30s. The frames came from Michael's during a buy one, get one free sale.
Maybe not everyone's choice of art for a toddler's room...
A print my dad won at an NRA dinner...

The lamp base was turned by a friend of my dad's and the shade came from Target. The tiny bear next to it was made by my friend Claudia years ago.
A barrel found in Maine for a nightstand.
And the finished quilt! My aunt did a fantastic (and speedy!) job with it.
My dad made Bert a little stool for Christmas, and it works perfectly at the end of his bed for a step up.
Let me show you...
And shelves full of books!
Sorry the shots are so awkward; it's a small room and tough to get good angles on, let alone good lighting.
Bert seems to like his room, and hopefully it will grow with him.
Saturday, June 1, 2013
A-Tisket, A-Tasket
...six vintage locker baskets.
I had been hunting around online for some kind of metal bin or basket for the shelf in our laundry room. I saw a few things I liked, but they all seemed a bit pricey. Then my friend Claudia, peruser of all things vintage, old, antique, and otherwise interesting, sent me a text that a store near her had a stack of vintage locker baskets. The size was right, I could get the six I wanted, and the price was reasonable, so I jumped on it. Well, I asked her to jump on it and she kindly went and got them for me.
Six fit nicely on the longest side of the shelf, and Claudia was able to get consecutive numbers, which makes my orderly self very happy.
Now we've managed to corral those odd-ball things that get stashed in the laundry room into matching bins that are a manageable size to get on and off this high shelf.

And though we definitely still have a ways to go in here, these are a major improvement over the previous situation.
The new baskets had the added benefit of spurring me on to sort out everything that was on that shelf and in the brown cabinet you see below and determine if it really belonged in the laundry room. And, surprise surprise, many things really belonged in the garage or the basement. The sorting, putting away, and discarding actually allowed us to move that cabinet out of the laundry room entirely, freeing up even more floor space.
Two of the baskets are still empty, and I'm not sure what will end up in them yet (but I have no doubt they will get filled eventually). My long term goal is to move most of the things out of our coat closet into this room, leaving the closet free for more toys and games since it is in the middle of our living space. There are plenty of hooks back here for seasonal coats and jackets, and out-of-season things can go to the cedar closet upstairs. So that's the goal and eventually we'll get there. Still have to pick that paint color though...
I had been hunting around online for some kind of metal bin or basket for the shelf in our laundry room. I saw a few things I liked, but they all seemed a bit pricey. Then my friend Claudia, peruser of all things vintage, old, antique, and otherwise interesting, sent me a text that a store near her had a stack of vintage locker baskets. The size was right, I could get the six I wanted, and the price was reasonable, so I jumped on it. Well, I asked her to jump on it and she kindly went and got them for me.
Six fit nicely on the longest side of the shelf, and Claudia was able to get consecutive numbers, which makes my orderly self very happy.
Now we've managed to corral those odd-ball things that get stashed in the laundry room into matching bins that are a manageable size to get on and off this high shelf.

And though we definitely still have a ways to go in here, these are a major improvement over the previous situation.
The new baskets had the added benefit of spurring me on to sort out everything that was on that shelf and in the brown cabinet you see below and determine if it really belonged in the laundry room. And, surprise surprise, many things really belonged in the garage or the basement. The sorting, putting away, and discarding actually allowed us to move that cabinet out of the laundry room entirely, freeing up even more floor space.
Two of the baskets are still empty, and I'm not sure what will end up in them yet (but I have no doubt they will get filled eventually). My long term goal is to move most of the things out of our coat closet into this room, leaving the closet free for more toys and games since it is in the middle of our living space. There are plenty of hooks back here for seasonal coats and jackets, and out-of-season things can go to the cedar closet upstairs. So that's the goal and eventually we'll get there. Still have to pick that paint color though...
Thursday, May 30, 2013
Riding the Rails
As we anticipate the arrival of Baby 2, most of the prep work involves getting Bert into his big boy room and making the nursery available for his little brother. We already had the furniture (it was mine as a kid), and the room had been functioning as a guest room. Because the furniture is dark green, we opted to work with what he had and go for a woodland/rustic look. We aren't totally finished, but Bert has already moved in.
The first step was replacing this beauty of a light fixture. Not only was it ugly, it only operated by the pull chain. Not the most ideal function in a child's room.
So after much cutting, climbing in and out of the attic crawlspace, and grumbling,
we had a light switch,
and a working light.
The new fixture looks kind of funky here, but it actually has a really nice aged copper look in person.
Now, on to painting. We went back and forth on color a bit, but finally settled on a light tan called "Blonde Wood." I washed the walls and taped off the room one day while Keith was at work, then we edged the room together and he rolled it on a weekend. For the second coat, I edged during the day and he rolled it in the evening when he got home.
They really do darken the room and the color almost exactly matches the walls.
Here's a sneak peek at the art that will go on the walls. It is all in frames but we haven't hung them yet. Keith and I are in agreement that we both really hate hanging pictures, mostly because of our old plaster walls. That and one of us must have one leg shorter than the other because we can't agree on what looks level.
All of that leads me to my now-it's-funny story. We had everything done in the room that needed to be done prior to Bert moving in, except for one thing: bed rails. Since the bed doesn't push up tight against the wall, we wanted a set that had a rail for each side. So last weekend, we headed off on a shopping trip for a bunch of things, one of which was the rails. We found a double-rail at Babies R Us and though I was a bit vexed that I couldn't find the 20% coupon that I knew came in the mail just days before, we went ahead and got them. We planned on putting Bert in the bed that night so later that afternoon, we opened up the box and deciphered the confusing assembly instructions, only to find that they wouldn't work on the bed. Because it is a "captain's" bed, with drawers underneath, there is no box spring. Which means sandwiching the rails between the mattress and box spring is impossible. We tried every configuration we could think of, contemplated buying a box spring or building something to allow the rails to fit below the mattress before finally calling it a day and putting Bert to bed in the crib.
After the little man was settled in for the night, I started searching online for a different bed rail option. On Amazon, I saw some foam bumpers that went under the fitted sheet. Then a lightbulb went off: in one of those forwarded emails about household tricks you wished you had thought of, I had seen pool noodles used as bed bumpers. I told Keith and he looked a bit skeptical at first, concerned that a single pool noodle wouldn't be enough to keep Bert from rolling out of bed. Then we hit on the idea of putting three together in a sort of pyramid formation to create a higher bumper. At this point, it was after 9:00, but we were so anxious to see if this would work. Keith called the first of our town's two grocery stores to see if they had pool noodles. We were cracking up as he waited on hold, picturing the guy who answered the phone searching the pasta aisle for pool noodles. Strike one, they didn't have any. So he called the next store. Yes, the girl said, the did have them, 2 for $4. Score. So Keith went out and got an armload of them. He said the women working were very intrigued as to what kind of fun he was going to have that late at night with a bunch of pool noodles, and the bed rail idea was kind of a let down.
But here's the thing: they absolutely work. A little duct tape, a half dozen pool noodles, 5 minutes, and we had bed bumpers for a fraction of the cost.
Bert has two nights and three naps under his belt and they stay put just fine and he hasn't rolled out. He has climbed out, but that's to be expected. The only disappointing thing is this morning on our walk, I saw pool noodles out front of the dollar store. It could have been a $6 project instead of $12.
All that's left for this room is painting the inside of the closet, hanging art, figuring out some curtains, and putting his quilt on the bed.
I got a little teary on Monday afternoon, laying him down in his big bed for the first time. He's our baby, and he's growing up.
The first step was replacing this beauty of a light fixture. Not only was it ugly, it only operated by the pull chain. Not the most ideal function in a child's room.
So after much cutting, climbing in and out of the attic crawlspace, and grumbling,
we had a light switch,
![]() |
| This is what happens when Keith does home decor shopping at Cabela's. |
The new fixture looks kind of funky here, but it actually has a really nice aged copper look in person.
Now, on to painting. We went back and forth on color a bit, but finally settled on a light tan called "Blonde Wood." I washed the walls and taped off the room one day while Keith was at work, then we edged the room together and he rolled it on a weekend. For the second coat, I edged during the day and he rolled it in the evening when he got home.
Next up was blinds. Like almost every other room in the house, the were old roller blinds that were really grimy and brittle. I found some room-darkening cordless blinds online from JC Penney, and they were really simple to install: just screw two brackets into the window frame, and snap the blinds in.
They really do darken the room and the color almost exactly matches the walls.
Here's a sneak peek at the art that will go on the walls. It is all in frames but we haven't hung them yet. Keith and I are in agreement that we both really hate hanging pictures, mostly because of our old plaster walls. That and one of us must have one leg shorter than the other because we can't agree on what looks level.
All of that leads me to my now-it's-funny story. We had everything done in the room that needed to be done prior to Bert moving in, except for one thing: bed rails. Since the bed doesn't push up tight against the wall, we wanted a set that had a rail for each side. So last weekend, we headed off on a shopping trip for a bunch of things, one of which was the rails. We found a double-rail at Babies R Us and though I was a bit vexed that I couldn't find the 20% coupon that I knew came in the mail just days before, we went ahead and got them. We planned on putting Bert in the bed that night so later that afternoon, we opened up the box and deciphered the confusing assembly instructions, only to find that they wouldn't work on the bed. Because it is a "captain's" bed, with drawers underneath, there is no box spring. Which means sandwiching the rails between the mattress and box spring is impossible. We tried every configuration we could think of, contemplated buying a box spring or building something to allow the rails to fit below the mattress before finally calling it a day and putting Bert to bed in the crib.
After the little man was settled in for the night, I started searching online for a different bed rail option. On Amazon, I saw some foam bumpers that went under the fitted sheet. Then a lightbulb went off: in one of those forwarded emails about household tricks you wished you had thought of, I had seen pool noodles used as bed bumpers. I told Keith and he looked a bit skeptical at first, concerned that a single pool noodle wouldn't be enough to keep Bert from rolling out of bed. Then we hit on the idea of putting three together in a sort of pyramid formation to create a higher bumper. At this point, it was after 9:00, but we were so anxious to see if this would work. Keith called the first of our town's two grocery stores to see if they had pool noodles. We were cracking up as he waited on hold, picturing the guy who answered the phone searching the pasta aisle for pool noodles. Strike one, they didn't have any. So he called the next store. Yes, the girl said, the did have them, 2 for $4. Score. So Keith went out and got an armload of them. He said the women working were very intrigued as to what kind of fun he was going to have that late at night with a bunch of pool noodles, and the bed rail idea was kind of a let down.
But here's the thing: they absolutely work. A little duct tape, a half dozen pool noodles, 5 minutes, and we had bed bumpers for a fraction of the cost.
Bert has two nights and three naps under his belt and they stay put just fine and he hasn't rolled out. He has climbed out, but that's to be expected. The only disappointing thing is this morning on our walk, I saw pool noodles out front of the dollar store. It could have been a $6 project instead of $12.
All that's left for this room is painting the inside of the closet, hanging art, figuring out some curtains, and putting his quilt on the bed.
I got a little teary on Monday afternoon, laying him down in his big bed for the first time. He's our baby, and he's growing up.
Subscribe to:
Posts (Atom)