Monday, May 30, 2011

Showered and Ready to Go

Nope, I'm not going to enlighten you with details of my personal hygiene. I want to tell you about my baby shower, which was last weekend and absolutely lovely. Thanks to so many generous family members and friends, we are pretty well set with the things we need for baby Bert (who should be arriving in about T - five weeks).

I had requested a tea party theme, and my mom and dear, dear friend Claudia were happy to comply. I didn't even get any dramatic eye rolls when I asked for cucumber sandwiches.

It started off with an invitation that I designed that looked kind of like this:


(If you got an invitation, you probably realize this looks a little different but Mommy doesn't need people hunting her down to make delicious scones for them.)

Now we were committed to a tea party. We wanted to keep it casual and light, with food that was easy to pick up and no hats and handkerchiefs necessary. Here's what we came up with for a menu:

Beverages
Iced tea (sweetened and unsweetened)
Fresh lemonade
Hot tea
Coffee
Ice water

Sandwiches
Pistachio & cranberry chicken salad in mini pitas
Tuna salad on mini croissants
Cucumber sandwiches on mini rye and pumpernickel bread

Sides
Spring mix salad with candied walnuts
Red wheat berry salad
Veggie tray
Ham and spinach pinwheels

Desserts
Lemon scones
"Take a Stroll" scones
Cranberry orange cornmeal muffins
Mini fruit pizzas
Chocolate-dipped shortbread

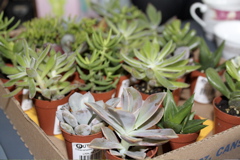
Mommy, Claudia, and I all took the day off Friday to get things ready. Claudia arrived with serving dishes galore and Mom had a carload of groceries. I had the stuff to make the favors. While Mom got busy in the kitchen with the things that could be made ahead of time, Claudia and I got down to business with the favors, which were little succulent plants in teacups. We had gone back and forth between candles in teacups versus plants, but plants won out since it's spring and plants grow like babies grow. We had all been on the hunt for teacups with saucers, but I hit the jackpot at the local Goodwill and another flea market nearby. The goal was not to pay over $1 for a teacup and saucer set, so Goodwill was a real deal at $.97 each. Oh, the thrill of the hunt. Then we were on the search for tiny succulent plants, which I found at a local garden and nursery center. So Claudia and I put a little gravel in the bottom of each teacup, added some cactus blend potting soil, and gently potted our tiny plants. This is a real feat for two girls who notoriously have trouble with houseplants.


Then we add a little plant poke I made that had a teapot on the front and said on the back, "Plant kindness and gather love. Thank you for sharing in our joy!"


We set them around the living room where the guests would be gathered and made sure to tell people to take one with them when they left.


Saturday morning was much busier, hence less photo-taking. Mom was up and baking by 7, making these lovely lemon scones, among other treats.


A gorgeous bouquet of flowers was delivered from a friend who couldn't attend and they made the perfect centerpiece.


Look closely at the serving dish in the photo above. Do you see the post-it note? That's one of my mom-mom's tricks to label all the serving dishes for what is going in them so that you know you have enough dishes. And it makes it really easy when people arrive and ask, "What can I do?" because everything is marked for where it needs to go.

I "swaddled" my great-grandmother's silver so it was easy to pick up. Doesn't it look like a nursery full of silverware? Baby on the brain, I know.


Other preparations involved rearranging some furniture, tying balloons to the mailbox, a last minute trip to the grocery store by Keith, de-wrinkling the table clothes (no time to iron, but running them through a cold rinse cycle and tossing them in the dryer did the trick), and retrieving food from my aunt's fridge (you can imagine how packed Mom's was).

We ended up with a table looked like this:


And a happy momma-to-be that looked like this:


We received so many generous, thoughtful gifts. (Thank you, thank you, thank you!) I could (and should) do a blog post just on the handmade things we received from so many talented people!

Now I know what you have really been waiting for: the recipes. So without further ado (and before my fingers fall off), here they are. I have to get the pistachio and cranberry chicken salad recipe from Mom yet but I'll post it as soon as I can.

Red Wheat Berry Salad
Ingredients:
1 c. hard red winter wheat berries, soaked overnight
1/2 c. raw wild rice
2/3 c. toasted chopped pecans
1 c. dried cranberries
1/2 c. chopped fresh parsley
1/2 c. chopped green onions
3 Tbsp. fresh lemon or lime juice
1 Tbsp. honey
1 Tbsp. dijon mustard
1 tsp. kosher salt
1/2 tsp. ground black pepper

Preparation:
• Soak the wheat berries overnight in cold water, covering them 3 inches. Drain the water in the morning.
• Boil the wheat berries in 6 cups of water for about 50-60 minutes, or until tender. Add more water as necessary to keep wheat berries covered during cooking. Drain excess water from the wheat berries when done.
• In another small pot, boil 2 cups of water. Add the wild rice and simmer for 45 minutes, or until the rice begins to split. Drain excess water.
• Combine the cooked wheat berries and wild rice in a large bowl.
• Whisk the lemon juice, honey, mustard, salt, and pepper to make the dressing. Add the dressing to the wheat berries and wild rice; mix thoroughly.
• Add the cranberries, pecans, parsley, and green onions and combine well.

Ham & Spinach Pinwheels
Ingredients:
1 can (8 oz.) refrigerated  crescent dinner rolls
1/3 c. cream cheese with oregano, basil, and garlic (any herb flavored cream cheese is fine)
4 slices deli ham
1/2 c. packed fresh spinach leaves

• Preheat oven to 375 degrees. Separate dough into 4 rectangles on cutting board. Press seams to seal.
• Spread each rectangle with about 1 1/2 Tbsp. of the cream cheese to within 1/4 inch of the edges. Top with one slice of ham and spinach leaves.
• Starting at short side, roll up each rectangle; pinch edges to seal. Cut each roll cross-wise into 6 slices using a serrated knife. Place slices cut side down on cookie sheet. Bake 12-15 minutes or until golden brown. Remove to cooling rack.

Fruit Pizza (We made these on individual sugar cookies, or you can make it on a pizza pan.)
Orange Glaze
3/4 c. orange juice
1/4 c. lemon juice
1 c. water
2 Tbsp. corn starch
Heat above to boiling; boil for 1 minute, stirring constantly. Remove from heat and let cool.

• Grease pan. Slice 1 package of refrigerated sugar cookie dough into 1/8" slices. Arrange on pizza dish. Bake at 375 degrees for 10 minutes. Let cool.
• Mix the following together and spread over cool cookie crust:
1 (8 oz.) package cream cheese, softened
1/3 c. sugar
1 tsp. vanilla
• Place fruit on top of cream cheese (bananas, kiwi, strawberries, etc.)
• Drizzle half of the orange glaze over fruit. Refrigerate.
I don't know what you are supposed to do with the other half of the glaze...


Take a Stroll Scones
Ingredients:
1 c. plus 2 Tbsp. flour
3/4 c. rolled oats
1/4 c. plus 1 Tbsp. light brown sugar
1 tsp. cinnamon
1 tsp. baking powder
1 tsp. baking soda
1/4 tsp. salt
1 stick cold unsalted butter, cut up
1/2 c. dried cranberries (or other dried fruit, chopped)
2 Tbsp. roasted, salted pumpkin seeds
3/4 c. whipping cream

• Mix: Measure flour, oats, 1/4 c. brown sugar, cinnamon, baking powder, baking soda, and salt into food processor. Pulse a few times.
• Cut: Drop in butter chunks. Pulse several times, cutting butter down to pea-size or smaller bits.
• Fold: Turn out into a large mixing bowl. Fold in dried fruit and seeds. Drizzle on a little cream at a time, folding with flexible spatula, until dough clumps (you may not need all the cream).
• Pat: Turn out dough (will still be clumpy and messy) onto a parchment lined baking sheet. Pat into a 1 1/2" thick disk, about 8" across. Brush the top with a little of the remaining cream and sprinkle with the remaining 1 Tbsp. brow sugar. Slice dough into 8 wedges and separate wedges by 1 inch.
• Bake: Slide into a 375 degree oven and bake until set and golden, about 15 minutes. Enjoy warm or room temperature.

Lemon Scones
Ingredients:
Scones:
2 c. flour
1/2 c. sugar
1 Tbsp. baking powder
1/2 tsp. salt
Finely grated zest of 1 lemon
3 Tbsp. cold unsalted butter, cut into 1/4" pieces
1 c. heavy or whipping cream, plus a little for brushing
1 egg yolk, beaten slightly
1/2 tsp. vanilla extract

Lemon Glaze:
1 c. confectioners' sugar
1 Tbsp. fresh lemon juice
1/2 tsp. lemon extract
1 Tbsp. melted butter
2 Tbsp. heavy or whipping cream

• Heat the oven to 400 degrees. Grease a large, heavy baking sheet (preferably not a dark one) and set it aside.
• Sift the flour, sugar, baking powder, and salt into a large mixing bowl. Add the lemon zest and toss the mixture with your hands.
• Using your fingertips, rub the butter into the dry ingredients until the mixture resembles fine crumbs.
• Make a well in the center of the dry ingredients. Pour in the cream, the yolk, and the vanilla extract and use a fork to blend the liquids within the well. Then use a wooden spoon to combine all the ingredients, just until the dough holds together.
• Scrape the dough onto a flour-dusted surface and then, using floured hands, knead it gently three or four times to form a ball. Flatten the ball into a disk about 3/4" thick, then cut it as you would a pie into 8 wedges. Transfer the pieces to a baking sheet, leaving at least 1/4" between them. Brush the tops lightly with cream.
• Bake the scones in the center of the oven until golden brown, about 16 to 18 minutes. Allow them to cool on the sheet for a few minutes and then transfer them to a wire rack.
• While the scones continue to cool, make the glaze. Combine all the ingredients in a small mixing bowl and whisk them until the mixture is smooth. If necessary, you can thin the glaze with water, stirring in no more than 1/2 tsp. at a time. When the scones have cooled for another 10 minutes, drizzle each one generously with the glaze.

For each of the scone recipes, Mom made 2 disks, cutting each into 8 wedges for 16 of each kind of scone and then just watched the baking time to be sure they didn't burn in the smaller size.


Whew! If you want a recipe for anything else we made, let me know and I'll track it down.

Special thanks to Mommy and Claudia for putting the shower together for Bert and I, and to Farah for taking photos during the shower!

Monday, May 23, 2011

Buh-bye, Peter Rabbit

Because we seem to live in the midst of a rabbit warren (definition: a place where rabbits breed or abound... I have wanted to use that since I read Watership Down in middle school), our garden and berry patch are fenced in. The poles where the green beans climb are not though, so they are vulnerable to our furry friends enemies, especially when they first sprout.
Our bean-growing setup
Last year, we bought a product called Liquid Fence, which worked really well at keeping the rabbits away. At almost $15 a bottle, it seemed a little expensive. With a price like that, it almost wasn't worth growing our own beans. This year, we decided to make our own rabbit repellent using this recipe from ehow.com:

What you need:
Water
Gallon container
Cayenne pepper
Red pepper sauce (like Tabasco)
Liquid dish soap
Funnel
Spray bottle

What to do:
1. Fill the gallon jug with clean water.
2. Add 3 heaping tablespoons of cayenne pepper to the jug, followed by 3 tablespoons of red pepper sauce and a squirt of dish soap.
3. Cap the container and shake vigorously.
4. Allow mixture to steep for two to three days.
5. Using a funnel, pour the mixture into the spray bottle.
6. Spray the leaves and stems of the plants and vegetables with the mixture, shaking the bottle to mix thoroughly before each application. It will be necessary to reapply the repellent after each watering and each time it rains.


Yummy...

Note from the recipe author: You can add crushed garlic if the rabbits become resistant to the basic recipe. After that, you can add raw eggs. Note from me: Raw eggs? Yuck!

Of course, by the time my repellent was ready, we were in the middle of several rainy days and the rabbits got to my bean sprouts before I could spray. We've applied a few applications and the beans seem to be bouncing back, so I think it's working. With all this rain we have been getting, we have to be diligent about getting out there and reapplying frequently.

Sunday, May 15, 2011

Spicing It Up

Ever have a project or a task that you keep thinking you need to take care of, and know you'll be happier if you just get it done but never feel like doing it?

The thing that has been hanging around my to-do list for weeks was to reorganize my spice rack. It was a wedding gift and came with the jars full of spices. Some of them we just never use though and since it is going on four years since we got married, if the spices haven't been used yet, they probably aren't going to be. And I had a drawer full of spices we do use that tumble around and I have to dig through every time I need something. So I decided it was finally time to empty out all the ones I don't use and fill the jars with ones I do and hopefully get all my spices in one place.

Probably the most tedious part of this was washing all the little jars. I think that's why I put it off so long.


Then I was able to take the most commonly used spices from here:


and here:


and get most of them in here:


Aren't my masking tape labels lovely? You would think since I work for a label printing company I could come up with something a little better. Not everything fits in the rack, but at least it frees up a drawer and the other oddball seasonings (like grill rubs and such) are confined to the white basket in the photo above, which fits neatly on the shelf above the spice rack. So at least everything is in the same spot.

And in case you are wondering, the spices in the rack are arranged alphabetically. Did you really expect something different? Keith got a chuckle out of that, but he'll be in trouble if I find things out of order.

Sunday, May 8, 2011

The Diaper Diaries: Part 1

It's Mother's Day and in honor of the occasion, let's talk about something all moms deal with: diapers. As a mom-to-be, I'm getting ready for diaper duty. We've decided to go with cloth diapers for two main reasons:

1. It's cheaper.
2. It's greener.

These are two deciding factors in a lot of things we do.

We opted for a diapering system called bummis. They were recommended by another new mom and seemed pretty simple (they require no pins, which was a huge relief to Keith).

The kit comes with 6 small diaper covers (to fit 7-15 lb babies), 24 organic cloth prefold diapers, a wet bag for storing dirty diapers, plus some disposable and washable liners. I also opted to order 24 more diapers (so that we have 48 total) and 4 medium diaper covers (to fit 15-30 lb babies). I ordered it all from clothdiapers.com and with the free shipping and a discount code I found online for 10% off the entire order, the whole kit and kaboodle cost right around $260. This should take us pretty close to potty training, though we may need to order a few of the large size diaper covers.

Basically, you fold the cloth diaper into thirds and lay it in the cover, which fastens with velcro much like a disposable diaper. Then when it's dirty or wet, you toss it in the wet bag and put a clean one in the cover. The covers can be washed right along with the diapers if need be but you shouldn't need to use a new cover with each diaper change. Anyway, that's how it's all supposed to work but I'll let you know in July (that's why this is Part 1).

I was pretty ecstatic when I came home from work to find these diapers waiting for me on the porch. They are just too adorable! Even Keith thinks they're cute. How could you not?


The kit also came with a handy instruction booklet and it recommended washing the diapers three times before using them. They are made from organic cotton and unbleached, so they still have a lot of the natural oils in them. Washing them takes care of getting rid of the oils, so that they absorb moisture properly. So even though little Bert has not arrived yet, I've already washed his diapers (all 48 of them) three times. And of course this had to be fit in on sunny days so that they could dry on the clothesline.


With the prospect of lots (and lots) of laundry ahead of us, we made another cheap and green decision: homemade laundry soap. We had been using Seventh Generation detergent and softener and were really happy with that. My allergies improved a lot once we switched to the dye and perfume free laundry products but they do get pricy, even with coupons. So, I did a little searching online about making your own laundry soap. There are loads (haha) of recipes and instructions and videos out there for liquid and powder versions. I opted for powder because the liquid ones made batches of 5 gallons and looked goopey. I didn't really want to store 5 gallons of mess in our already crowded laundry/mud room. Here's the recipe I settled on:

Laundry Soap
Use 1 tablespoon to 1/4 cup per load.
2 cups Borax
2 cups washing soda (I found this on the shelf right next to the Borax; Arm & Hammer brand is what our grocery store carried)
1 cup baking soda
1 bar soap, any kind (lots of things I read recommended Fels Naptha so that's what we used for this first batch; I found it with the bar soap in the toiletry/drug section of the grocery store)


1. Cut soap up into large chunks with a knife.

2. Throw the chunks into a food processor and blend into powder, or grate with cheese grater.

3. In large plastic tub or bucket, stir together Borax, washing soda, and baking soda. Allow to settle and be careful not to breathe in the powder.


4. Stir in grated soap.


One batch of soap fits perfectly into a Trader Joe's cookie tub. Oh how the little things in life thrill me!

A couple notes and recommendations:
• Cut the soap up ahead of time into smaller chunks and let it dry for a few days. I almost burned out the motor on our Magic Bullet grinding it into a powder.
• Check the dollar store for bar soap; you can probably get a 3-pack for $1.
• If you are going to do this, it's worth keeping your eyes open at flea markets and yard sales for a food processor to use just for this purpose.
• You can use scented soaps or add a few drops of essential oil if you would like a light fragrance. I chose not to so we could avoid any allergy issues.

Because I knew everyone would be so interested, I did a little number crunching to figure out how much cheaper our homemade laundry soap is compared to the eco-friendly detergent we were using. By some rough guess-timations, one batch of soap cost me $3.34. I say rough because I didn't measure what was left of the Borax and washing soda, I just looked in the boxes and estimated how many batches a whole box would yield (at least 3 or 4). One batch of soap is approximately 6 cups, so if you use the whole 1/4 cup per load, that's 24 loads and comes out to $.14 per load. I think the per load price is actually a little high, because I probably won't use the full 1/4 cup and there is probably more Borax and washing soda left than I've accounted for.

On the other hand, the Seventh Generation detergent costs $7.99 per bottle, labeled as enough for 33 loads. That comes out to $.24 per load. So, even with my high estimates, I still come out 10 cents ahead on every load. Plus, I typically use fabric softener with the detergent and what I've read says it isn't necessary with the homemade laundry soap. The savings just keep coming.


I guess there will be a lot of these appearing in our house!

Wednesday, May 4, 2011

A Day with the Queen

As everyone knows (unless you've been living under a rock), last Friday was the royal wedding. Even though my invitation from Wills and Kate must have been lost in the mail, it was still worth celebrating. I used a vacation day and headed to my Mom-mom's to watch the wedding with her. I went to her house Thursday night so that we could get up early (as in, 3:45 am early) to see all the royal hoopla. 


I was greeted at the door by Bluey, the dapper stone whippet. Even he was dressed for the occasion in his tux. 


We had a little spread of English-inspired snacks, and glittery foam tiaras. (The recipe for the chocolate biscuit cake—supposedly a favorite of Prince William's—is at the end of the post.)


We had a lovely time watching the wedding coverage from 4 until about 7:30, when we both agreed it was time to head back to bed for a few hours. Then we spent the rest of the day doing a little shopping and having a nice lunch. Then, just before I left, this arrived via Royal Air Mail:


Months ago, I saw that this toy set was being made to celebrate the royal wedding and sent the link to Mom-mom because I thought it was adorable. She tried to order it online but couldn't get it shipped here from the UK. Lucky for me, she has a cruise friend that lives in England who found it and sent it over. Bert has his first princess toy! 


Keith is glad there is a calvary officer as well...

Here's the tea cake recipe. Should His Highness ever drop by for a spot of tea, you'll be prepared.

Chocolate Biscuit Cake
from "Eating Royally" by Darren McGrady

8 ounces tea biscuits or cookies
1/2 stick (4 Tbsp.) unsalted butter, softened
1/2 cup granulated sugar
12 ounces dark chocolate
1 egg, beaten
1 ounce white chocolate

1. Lightly grease a small (6-inch) cake ring or springform pan with butter. Place on parchment-lined tray. Break each of the biscuits in almond-size pieces; set aside. Cream the butter and sugar in a bowl until a light lemon color.


2. Melt 4 ounces of the dark chocolate in a double boiler. Off the heat, add the butter and sugar mixture, stirring constantly. Add the egg; continue stirring. Fold in the biscuit pieces until they are all coated with the chocolate mixture.


And right about here I forgot to keep taking pictures...

3. Spoon the mixture into the prepared cake ring. Try to fill all the gaps on the bottom of the ring, because this will be the top when it is unmolded. Refrigerate, at least 3 hours.


4. Remove the cake from the refrigerator; let it stand while you melt the remaining 8 ounces of dark chocolate in a double boiler. Slide the ring off the cake; turn the cake upside down onto a cooling rack. Pour the melted chocolate over the cake, smoothing the top and sides using a butter knife or spatula. Allow the icing to set at room temperature. Carefully run a knife around the bottom of the cake where it has stuck to the cooling rack, transfer the cake to a cake dish. Melt the white chocolate; drizzle on top of the cake in a decorative pattern.


I didn't have a small springform pan, so I just put it in a small dish and cut it with a sharp knife and pried it out. Not pretty, but still delicious!


When I got home on Friday afternoon, I tried to share some of the fun with Bailey. She was unenthusiastic.


Concrete dogs have more energy than this ol' girl.
Related Posts Plugin for WordPress, Blogger...